The Muse Scarlett Yvette Royal

The Muse Scarlett Yvette Royal

Tuesday, August 12, 2014

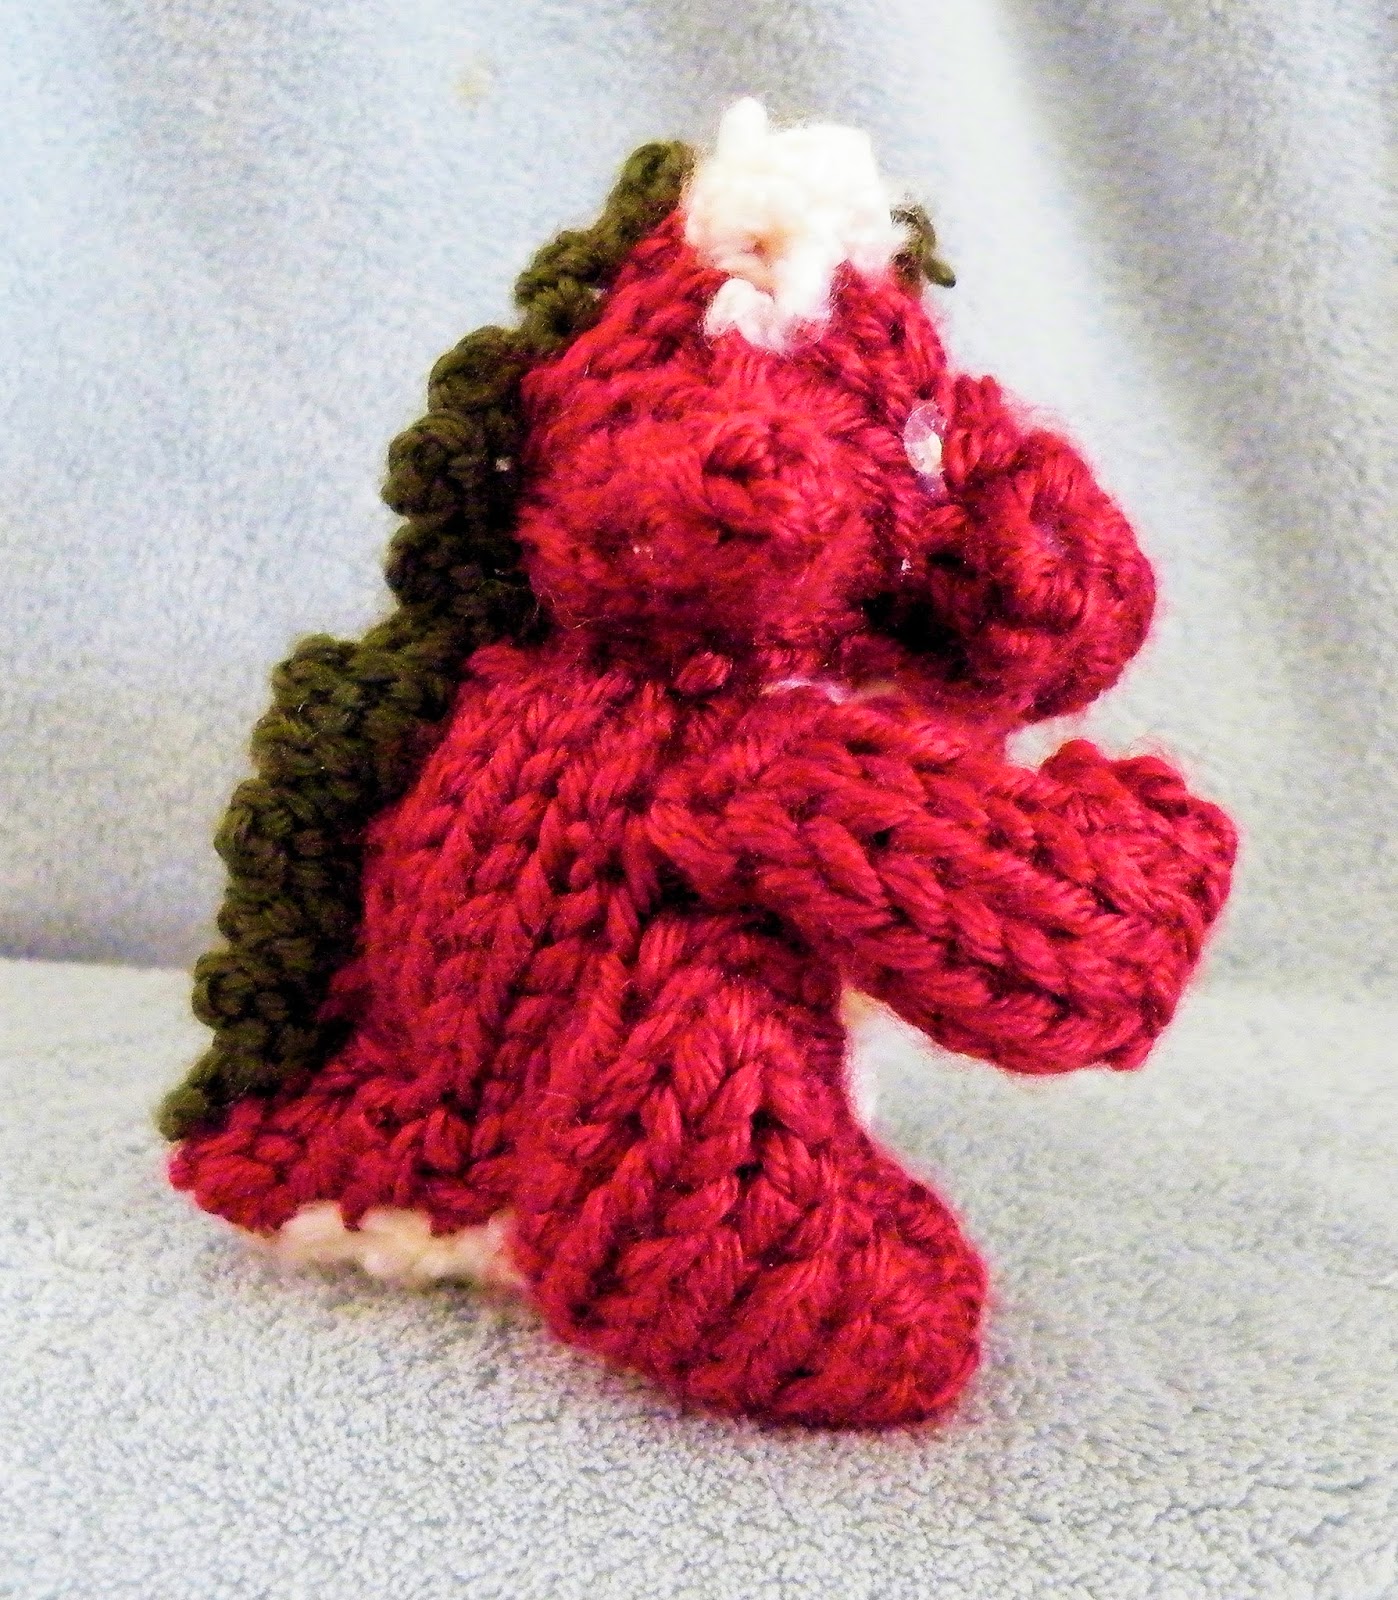
How to Loom Knit a Mini Dragon


Mini Dragon

Supplies:
12 peg loom
 looming hook
crochet hook sizeF
crafters needle
polyfil
3 colors of scrap yarn
2 very small eyes

Terms:
DSCO- Draw String Cast On
K- Knit
P- Purl
ID- Internal Decrease
D- Decrease
COF- Cast Off
DSCOF- Draw String Cast Off

Head: Flat: Main Color: 12 Peg Loom
DSCO 12 pegs
Row 1-5: K12
Row 6: K2 (Ear K2pegs 11rows) (Horn: Change to horn color: K2pegs 11rows) (Horn2 repeat just like horn one) (Ear change back to main color and repeat like you did for first ear) K2
Row 7-9: K12
Row 10: ID 12 to 6 pegs
Row 11: K2, P2, K2
Row 12: K6
Row 13: K1, K1peg 3rows, P2, K1peg 3rows, K1
Row 14-15: K6
DSCOF
Sew up snout, ears, horn, and close up back of head, and stuff.

Belly: belly color: flat: 7 pegs
DSCO 7 pegs
Row 1-2: K7
Row 3: P7
Row 4: K7
Row 5: P7
Row 6: K7
Row 7: P7
Row 8: D1 P1, P3, D1 P1 (5)
Row 9: K5
Row 10: D1 P1, P1, D1, P1 (3)
Row 11: K3
Row 12: D1 on each end P1
Row 13: K1
Snip end pull through

Back of body: Main Color: Flat: 10 Pegs
DSCO 10 pegs
Row 1-10: K10
Row 11: K1, D1 K1, D1 K1, D1 K1, D1 K1, K1 (6) Bring loops together and tighten loops.
Row 12: K6
Row 13: D1 K1, K2, D1 K1 (4)
Row 14: K4
Row 15: D1 K1, D1 K1 (2)
Row 16: K2
Row 17: D1 K1
Snipe end pull through, sew belly and back together, then stuff. Sew head on lining back of the head up with the tail.

Legs: Main Color: Flat: 10 pegs
DSCO 10 pegs
Row 1-3: K10
Row 4: D1 K1, K6, D1 K1 (8)
Row 5-9: K8
COF
Make 2, sew up bottom and front, stuff, and sew on body lining up with ears at very top of body.

Back legs: Main Color: Flat: 12 pegs
DSCO 12 pegs
Row 1-3: K12
Row 4: COF 2, K10
Row 5: COF 2, K8
Row 6: D1 K1, K4, D1 K1 (6)
Row 7-10: K6
Row 11: D1 K1, K2, D1 K1 (4)
COF
Make 2, sew up front and half of bottom, stuff, then finish sewing up. Sew right under legs, lined up with ears.

Spine: Crochet Hook size F
Slip knot
Chain 25
Chain 4, count back 4 spaces and slip stitch, slip stitch next space.
Repeat this Chain 4 run all the way to the end.
Snip end pull through loop tighten. Sew spine start at the head just in front of the horns and sew down the middle back of the head and down the back of the body. Sew on or hot glue your eyes onto your dragon at the base of the snout lined up with the space between the horn and the ear.
Your done!!!
Note: I did double up my yarn to make it thicker for stuffing. Also if you are having a hard time seeing how to do the legs, please visit the mini dog video to watch how to make the legs. You can also follow the mini dog pattern video as for as the back of the head, after the ears, the internal decrease for help as well. This video is come of my last footage on the old action cam for looming videos. After this should be easy to see videos.

How to Loom Knit a Turtle and Ladybug


Turtle and Ladybug Pattern

Items:
Flower Loom
24 peg circular loom
3 colors of yarn
Polyfil
2 Eyes
Looming Hook
Crafters Needle
Crochet Hook

Terms:
CO- Cast On
COF- Cast Off
DSCOF- Draw String Cast Off
EW- E-Wrap
P-Purl
D- Decrease

Body: Circular: 24 peg
DSCO 24 pegs in light green
Row 1-6: EW24
Row 7: Change color to dark green, P24
Row 8-18: EW24
Row 19: D every other peg tossing the bottom loop over.  (12 pegs)
DSCOF
Close up top, stuff, and then close up the bottom.

Head: Flat: 24 Peg Circular Loom
CO 16 pegs
Row 1-4: EW
Row 5: D1 EW13 D1 EW1
Row 6: D1 EW11 D1 EW1
Row 7-11: EW
COF
Sew up Stuff and sew onto body following the purled line.

Legs: Circular: Flower Loom
(You can use the legs as the head for the ladybug)
DSCO 12 pegs
Rows 1-6: EW
COF
Draw string your cast on, Stuff and sew on the body purled line. Make 4. Line front legs directly by head, then count three stitches over from front legs and sew on back legs. Glue on eyes.
Ladybug Legs: Flower Loom: 6 pegs
DSCO 6 pegs
Row 1-7: EW
DSCOF
Sew up side, make 6 legs. Sew them lined up in 3 on each side of the ladybugs head.
Mirror Spots for shiny reflective fun.
Crochet hook size G.
Chain 10, slip stitch into first chain.
Chain 1. Single crochet 20 times all the way around creating a ring, slip stitch into first single crochet.
Chain 2 snip end pull end through and tight the chain to a knot.
Trace out your edge of your completed ring and use that as a guide to cut out mylar or sticker mirrors, to glue onto the back of your rings. Make 5.  You can also use button, or felt to create spots to.

Friday, August 8, 2014

How to Make a Castle Lantern


Supplies:
Hot Glue Gun and lots of glue
Regular Elmers Glue
Popsicle Sticks
Pistachio Shells
Old Magazine
Pony Beads
Wooden Beads
Tooth Picks
Craft Paint
Ruler
Scissors
Cardboard from a small boom box package
Masking Tape
Egg Carton
Printer

Most of these supplies are recycled materials and should be easy to come by or you could ask a friend for if they use items you don't. This is a fun project and even a child should be able to get involved in making this.

Start off by cutting holes in the tops of your lifted edges of your cardboard from the small boom box package like in video. Then add the egg carton bottoms cut individually to the tops of the cut holes by hot gluing them on. Then masking tape the whole top.


 Next step, hot glue 2 popsicle sticks together to create a corner. Do this 4 total times. Then hot glue them into your corners. After that hot glue in your other popsicle sticks to create breaks along the long sides of the cardboard. The hot glue popsicles sticks at the base all the way around to create a standing building, as shown in video.

After that you move to prepping your shingle areas on your roof. So take pages out of your old magazine and fold them in half 4 times. Use your ruler to measure an inch down marking your inch zones. Now cut a straight line on your first inch zone then cut a triangle on the other side. Repeat this step and to keep your triangles even use your first cut out as a guide. You will need enough to cover the roof area. When gluing these on you use elmers glue, making sure to stagger your triangles. Start from the bottom and work to the top.

After this you want to hot glue on your pistachio shells to the popsicle sticks to create a stone looking texture. Once this is done then go in and fill the space between them in with hot glue like mortar.Also hot glue on the shells from bottom to top of the egg carton domes.

Now you want to take your tooth picks and shove them into the tops of the egg carton areas. Then put a wooden bead down first, then a pony bead hot gluing them down. The on the top edges of the roof hot glue pony beads around the edge.

Wow that was some work right, but now as weird as this things looks so far, lets bring it to life with some paint. So you want a white canvas base so either spray paint or just paint the entire things white. OMG the castle appears and looks neat then.

Now you want to paint the pistachio shells grey or silver at the base like stone. The roof what ever color you want, and the pistachio shell domes gold as well as the beads. Adding fun glow in the dark accents, sponge on glow in the dark green around the base, glow in the dark orange at the tips of the roof triangles, and glow in the dark yellow on the edges of the domes.

After this print up the images below to add to your castle so that when the light shines through it will give you a beautiful image. Don't forget you will need the mirror image of the images. 2 of the couple, 2 of the dragon, and 4 of the knight and horse. After printing and cutting them to size glue them in with elmers glue.

To add an extra touch poke holes in the roof to create light spots when lit up on the ceiling in a nice pattern.

Your Done!!! Add your lights and watch the beautiful fun!!!


Note when figuring out the size to print your images measure the space to see the closest size to choose. 


Friday, July 25, 2014

How to Loom Knit a Large Teddy Bear


Large Loom Knitted Teddy Bear

Supplies
36 peg loom
looming hook
crafters needle
crochet hook
polyfil
2 eyes
2 skeins of yarn

Terms:
CO- Cast On
EW- E-Wrap
P-Purl
ID-Internal Decrease
D-Decrease
DSCOF- Draw String Cast Off
COF- Cast Off
(DEW-Double E-Wrap will give instructions on this if you want to stuff your animal firmer)

Note this is put together and generally loom knitted in the same manner as the 24 peg loom teddy. Please feel free to refer to it as a guide when making this one. Only difference is, is you are working with more peg.

Head: Flat: 36 pegs
EW CO 36 pegs
Row 1-11: EW36
Row 12: EW8 (Start Ear: EW7 2rows, EW5 2rows, EW3 3rows, EW5 2rows, EW7 2 rows) EW6, (work other ear just like 1st ear) EW8
Row 13-20: EW36
Row 21: ID from 36 to 18 pegs
Row 22-29: EW18
DSCOF
Sew up snout, ears, and close up back of head. Stuff.

Body: Circular: 36 pegs
EW CO 36 pegs
Row 1-20: EW 36
Row 21: P15 (Tail: EW6 2rows, EW4 2 rows, EW2 3rows, EW4 2 rows, EW6 2rows) P15
Row 22-28: EW 36
Row 29: D by every other peg and knock the bottom loop over the top.
DSCOF
Close up bottom, tail, and stuff. Sew head on lining back of head up with tail.

Arms: Flat: 20 pegs
EW CO 20 pegs
Row 1-21: EW 20
DSCOF
Sew up side, stuff, and make 2.  Sew at very top of body lined up with ears.

Legs: Flat: 24 pegs
EW CO 24 pegs
Row 1-8: EW 24 pegs
Row 9: D1 EW1, EW20, D1 EW1 (22)
Row 10: D1 EW1, EW18, D1 EW1 (20)
Row 11: D1 EW1, EW16, D1 EW1 (18)
Row 12-23: EW18
COF
Sew up bottom and front, stuff, and make 2. Sew on purled line, lining the outer edge of the leg with the arms.
If you want to do the double e-wrap here is the trick. Follow the instructions after you have EW 2 rows (this is your cast on) EW 3rd row as your 1st starting row. Continue following the pattern as written keeping 2 loops on the pegs after each row. On the Internal Decrease row you will need to knock all loops down to 1 loop then decrease, then do a straight row of EW to get you back to 2 loops on each peg, at this point EW all pegs again to get your 1st row after the ID. On any decrease like on the legs on the ends. Just knock the loops down to one on the decreased peg, move the peg, and when you EW knock 2 loops over rather than 1 on that decreased peg to keep to 2 loops on each peg after a row.  If you have any questions just leave me a comment below or on my facebook page.  

Thursday, July 24, 2014

Loom Knit a Mini Dog


Loom Knit Mini Dog

Supplies:
12 peg loom
looming hook
crafters needle
crochet hook
scrap yarn (I do double strand my yarn for this project)
polyfil
2 eyes

Terms:
EW- E-Wrap
K-Knit
P-Purl
D-Decrease
CO- Cast On
DSCO- Draw String Cast On
COF- Cast Off
DSCOF- Draw String Cast Off
ID- Internal Decrease

Head: Flat: 12 pegs
DSCO or EW CO 12 pegs
Row 1-5: K12
Row 6: K3 (Start Ear: K3 peg 21 rows) Repeat ear on next 3 pegs, K3
Row 7-9: K12
Row 10: ID from 12 to 6 pegs
Row 11-16: K6
DSCOF
Sew up snout, ear, and back of head. Stuff.

Body: Circular: 12 pegs
DSCO or EW CO 12 pegs
Row 1-10: K12
Row 11: P12
Row 12-14: K12
DSCOF
Close up bottom and stuff. Sew head on body.

Fron Legs: Flat: 10 Pegs
DSCO or EW CO 10 pegs
Row 1-3: K10
Row 4: D1, K1, K6, D1, K1 (8 pegs)
Row 5-11: K8
COF
Sew up bottom and front, stuff, make 2. Sew right under snout at the top of the body. Make sure the space between the legs lines up with the snout.

Back Legs: Flat: 12 Pegs
DSCO or EW CO 12 pegs
Row 1-4: K12
Row 5: COF2, K10
Row 6: COF2, K8
Row 7: D1, K1, K4, D1, K1
Row 8-10: K6
Row 11: D1, K1, K2, D1, K1
COF
Sew up leaving half the bottom open, stuff, the finish sewing up. Make two. Sew on the sides of the body lined up with ears.

Tail: Flat: 3 pegs
DSCO or EW CO 3 pegs
Row 1-10: K3
COF or DSCOF
Sew on center back of boy on purled row.

Hot glue or sew on your eyes at the base of snout lined up with the inner ears.

Wednesday, July 23, 2014

How to Clean Your Knitted Stuffed Animals


                After a child has given much love to your creations they can get quite dirty, and we all are scared to throw it in the wash cause it might ruin the loved treasure. It is okay, here is the answers to how to clean them and get them out of the wash still looking good. What if you messed up washing and have a animal that has lint all over it? It is also okay I will go through how to help clean up your stuffed animal if that is the case.

1. Put your stuffed animal in a smooth cotton pillow case and tie off the end of the pillow case.
2. Run through with cold water and detergent through a wash cycle.
3. Pull out of pillow case after wash cycle and let air dry.
4. Tuck your ends that may have come out in the wash with a crochet hook, reshape, and it is ready for the child to love all over again.

Note: DO NOT USE A FLANNEL PILLOW CASE!!! DO NOT JUST THROW IN THE WASH WITHOUT PILLOW CASE!!! This will give you messed up stringy yarn and lint all over the animal.

If this happens you can fix it though. You need scissors, and a fabric shaver. I use a Singer fabric shaver.

1. Pull all the lint off with your hands that easily comes off.
2. Using your scissors cut your stringy bits of yarn off making sure not to cut the looped part itself. This is a very surface process.
3. Take your fabric shave and lightly brush on the edges of your animal to get the leftover lint and stringy bits off.

You should have an animal that looks right again, and ready for a child to love.

Thursday, July 17, 2014

Loom Knitting Horse, or My Little Pony


 helpful videos for techniques
This one to show double e-wrap, and tail and hair technique
This shows basic technique, as well as internal decrease.
Options for adding eyes, and how to make them.

Loom Knitting Horse, or My Little Pony

Supplies:
24 and 12 peg loom
Looming Hook
Crafters Needle
Crochet Hook
Polyfil
Yarn (strands doubled)
Eyes

Terms:
DEW: Double E-Wrap (this is a technique to assist in making the knit tighter for firmer stuffing, you EW your pegs 3 times to start, then toss bottom loop over top 2 loops keeping 2 loops on the peg) Please check out my Eeyore video to view this technique.
EW: E-Wrap
ID- Internal Decrease
CO: Cast On
DSCO: Draw String Cast On
COF: Cast Off
DSCOF: Draw String Cast Off

Head: Flat: 24 Peg
DSCO 18 pegs
Row 1-3: DEW18
Row 4: DEW4 (Ear: DEW4 pegs 4 rows, DEW2 pegs 3rows, DEW4 pegs 4rows) DEW2, Repeat ear section, DEW4
Row 5-10: DEW18
Row 11: EW18 (note throw both bottom loops over top loop to leave 1 loop on the peg, this is to prep for the ID.)
Row 12: ID from 18 to 9 pegs
Row 13-17: DEW9
Row 18: EW9 (repeating the same thing  as row 11 to prepare for COF)
DSCOF
Sew up snout, ears, and close back of head. Stuff

Neck: Circular: 12 Peg
EW CO 12 pegs
Row 1-4: DEW12
Row 5: EW12 (Toss bottom 2 loops over top to leave 1 loop remaining.)
COF
Tighten cast on, sew head on from your cast of side. Stuff.

Body: Circular: 12 Peg
DSCO 12 pegs
Row 1-9: DEW12
Row 10: EW12 (Toss Bottom 2 loops over top loop leaving 1 loop)
DSCOF
Close up one end, then before closing up other end stuff then close it up. Start by sewing the bottom of the neck to the closed hole of the body and work your way around. You should create a nice angle for the neck and head sitting on the body. 

Legs: Flat: 12 Peg
DSCO 10 pegs
Row 1-12: DEW10
Row 13: EW10 ( again toss bottom 2 loops over top to to leave 1 loop for cast off)
COF
Close up bottom and stuff. Make 4. Sew on all for legs 1 right in front of the other on the belly leaving 1 column space between the left legs and right legs on the belly.

To View Hair technique also view Eeyore video for what I am doing for the tail and mane, for visual help.
Tail: Flat: 24 Peg
EW CO 18 pegs
Row 1: EW18
Row 2: EW2 23rows 9times
Pull cast on loops back onto the pegs
Row 3: EW18
DSCOF
Sew on tail at back end area. Trick pull on your loops to make them longer.

Mane: Flat: 12 Peg
EW CO 12 pegs
Row 1: EW12
Row 2: EW2 17rows 6times
Pull cast on loops back onto the pegs
Row 3: EW12
COF
Sew on mane starting and inch infront of the ears and on down the spine area.

For eyes you can add my crocheted eyes and instead of glueing plain black pony beads take your color buttons with black pony beads and glue them to the fatter end. Crochet black around your edge if desired to create the My Little Pony eyes. For Horse use whatever you like.