This is my usual Christmas sale I have every year in my Ravelry store. 75% off all patterns and ebooks for all of December!!!! Take advantage I only do this deep of a sale once a year. https://www.ravelry.com/designers/scarlett-royal
How to Loom Knit a Sphere, Cone, and Cylinder on the Universal X Loom!!!
You need an Universal X Loom
Each shape is worked to 48 pegs but can be worked higher.
You will also need a looming hook and polyfil.
Terms:
WD: Wedge Decrease: First step is to move your wedge down one notch
to the next set of pegs. Then move the last set of stitches over to the wedge
pegs on each side. Then knit the 2 stitches together on the wedge pegs.
WI: Wedge Increase: Requires several steps. Twin knit the 1st wedge
peg, move the stitch you just made to the previous peg. Pic 1-6. Now knit the 2
wedge pegs. Pic 7-10. Twin knit the next peg beside the wedge peg, move the
stitch you just created to the 2nd wedge peg. Knit the peg beside the second
wedge peg you just twin knitted. Pic 11-18. Now move your wedge up one set of
pegs. Place the extra loop beside the first wedge peg onto the empty peg beside
the wedge peg. Now place the extra stitch on the 2nd wedge peg on the empty peg
beside the 2nd wedge peg. Pic 19-23. You have now increased by 2.
K: Flat Knit:
Process of tossing bottom loop over the top loop.
K2tog: Knit 2
Stitches Together: Process of tossing 2 loops over the top working strand.
TK: Twin Knit:
Pull the previous stitch back, place the working yarn in front of the peg, and
put the previous stitch back as it was.
P: Purl: Process
of pulling working yarn from the bottom of the stitch through to the top, take
existing stitch off, and place the new stitch on
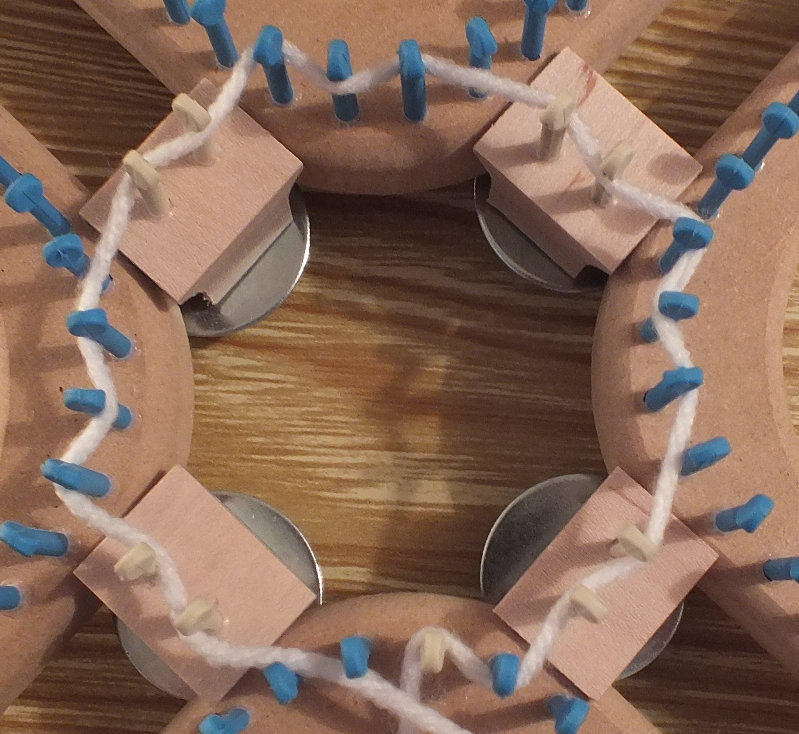
DSCO: Draw String
Cast On: Weave the working yarn back and forth between the pegs, every
other peg should be empty. The take the working yarn and lay it over the empty
pegs and toss the pegs with loops over on the pegs with loops.
DSBO: Draw String Bind
Off: Send tail through every other stitch and take the stitch off after you
send the tail through. After the first round you should have half the pegs with
stitches and half without. Then send the tail through the remaining stitches.
Sphere
DSCO 24 pegs Circular
Row 1-3: K
Row 4: WI 4, and K
Row 5-7: K
Row 8: WI 4, and K
Row 9-11: K
Row 12: WI 4, and K
Row 13-18: K
Row 19: WD 4, and K
Row 20-22: K
Row 23: WD 4, and K
Row 24-26: K
Row 27: WD 4, and K
Row 28-30: K
DSBO
Stuff and close up ends.
How to make larger. For every increase double the rows you do between your increase and decrease sections. Example here we are doing 3 increases so we will do 6 rows. Lets say you do 7 increases you would do 14 rows between your increase and decrease sections. There are always 3 rows between your decrease and increases.
Cone
DSCO 24 pegs circular
Row 1-3: K
Row 4: WI 4, and K
Row 5-7: K
Row 8: WI 4, and K
Row 9-11: K
Row 12: WI 4, and K
Row 13: P
Row 14-28: K
Row 29: WD 4, and K
Row 30-44: K
Row 45: WD 4, and K
Row 46-60: K
Row 61: WD 4, and K
DSBO
Place in a flat foam or cardboard circle at the bottom stuff and close up top.
General rule follow the beginning like normal, you can make larger by simply increasing more. Alway Purl 1 row before you start doing the top of the cone. If you want a sharper point at the top of your cone do 7 rows knit after the very last decrease row. If you want a fatter cone do 10 rows between decreases instead of 15 rows.
Cylinder
DSCO 24 pegs circular
Row 1-3: K
Row 4: WI 4, and K
Row 5-7: K
Row 8: WI 4, and K
Row 9-11: K
Row 12: WI 4, and K
Row 13: P
Row 14-43: K
Row 44: P
Row 45: WD 4, and K
Row 46-48: K
Row 49: WD 4, and K
Row 50-52: K
Row 53: WD 4, and K
Row 54-56: K
DSBO
Have 2 cardboard or foam circles, put 1 circle in and stuff put the other in and close up ends.
You can increase or decrease more to make larger and you always do a purl after you increase and a purl row before you start to decrease. You can do however many rows you want between your purl rows. I did 30 above but you can do more or less depending on what you want.
Useful Tips
Take the option of removing the bottom sections or top sections of these shapes or combine the shapes to create stuffed animals. You can do the sphere and when you go to decrease switch to the cone to create a head with a pointy hat. You can do the cylinder and not do the decrease section and create a body. You can also do a sphere but do a lot more rows between your increases and decreases to create a leg or arm. Have fun and create what you want using these 3 basic shapes on the X loom.
WD: Wedge Decrease: First step is to move your wedge down one notch
to the next set of pegs. Then move the last set of stitches over to the wedge
pegs on each side. Then knit the 2 stitches together on the wedge pegs.
WI: Wedge Increase: Requires several steps. Twin knit the 1st wedge
peg, move the stitch you just made to the previous peg. Pic 1-6. Now knit the 2
wedge pegs. Pic 7-10. Twin knit the next peg beside the wedge peg, move the
stitch you just created to the 2nd wedge peg. Knit the peg beside the second
wedge peg you just twin knitted. Pic 11-18. Now move your wedge up one set of
pegs. Place the extra loop beside the first wedge peg onto the empty peg beside
the wedge peg. Now place the extra stitch on the 2nd wedge peg on the empty peg
beside the 2nd wedge peg. Pic 19-23. You have now increased by 2.
DW CO: Double Wrap Cast On: Process of
E-Wrapping the peg twice and tossing the bottom loop over the top. Great for an
EFG loom cast on.
K: Flat Knit:
Process of tossing bottom loop over the top loop.
K2tog: Knit 2
Stitches Together: Process of tossing 2 loops over the top working strand.
TK: Twin Knit:
Pull the previous stitch back, place the working yarn in front of the peg, and
put the previous stitch back as it was.
P: Purl: Process
of pulling working yarn from the bottom of the stitch through to the top, take
existing stitch off, and place the new stitch on.
BO: Bind Off:
Knit pegs 1 and 2, place loop 2 on peg 1, and toss bottom loop over. Move loop
back to peg 2. Knit 2nd stitch, move to peg 1, and toss bottom loop over. Move
stitch to peg 2. Repeat from the knit 2nd stitch, move to peg 1, and toss
bottom loop over, till you have no more stitches left on the loom.
DSCO: Draw String
Cast On: Weave the working yarn back and forth between the pegs, every
other peg should be empty. The take the working yarn and lay it over the empty
pegs and toss the pegs with loops over on the pegs with loops.
DSBO: Draw String Bind
Off: Send tail through every other stitch and take the stitch off after you
send the tail through. After the first round you should have half the pegs with
stitches and half without. Then send the tail through the remaining stitches.
Casting on, casting onto the X loom you are simply following
the edge of the loom all the way around.
For easier knitting. If knitting on a table, find a high
table to knit on closer to eye level. The X loom is easier knitting in your
lap. Also if you are knitting counterclockwise you need to have your yarn on
the right side. If you are knitting clockwise you need your yarn on the left
side. If you are knitting flat having the yarn in front of you is best. If on a
table knitting flat, in front and elevated above the work is where the yarn
should be. Allow yourself several projects to get used to the feel of looming
with this loom. Also you don't need to always have the 4 wedges equally away
from the middle. See video for well setting up wedges on the looms for quick
tricks.