The Muse Scarlett Yvette Royal

The Muse Scarlett Yvette Royal

Sunday, November 11, 2018

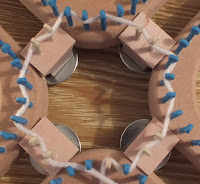
How to Loom Knit a Sphere, Cone, and Cylinder on the Universal X Loom


How to Loom Knit a Sphere, Cone, and Cylinder on the Universal X Loom!!!


You need an Universal X Loom

Each shape is worked to 48 pegs but can be worked higher. 

You will also need a looming hook and polyfil. 


Terms:

WD: Wedge Decrease: First step is to move your wedge down one notch to the next set of pegs. Then move the last set of stitches over to the wedge pegs on each side. Then knit the 2 stitches together on the wedge pegs. 

WI: Wedge Increase: Requires several steps. Twin knit the 1st wedge peg, move the stitch you just made to the previous peg. Pic 1-6. Now knit the 2 wedge pegs. Pic 7-10. Twin knit the next peg beside the wedge peg, move the stitch you just created to the 2nd wedge peg. Knit the peg beside the second wedge peg you just twin knitted. Pic 11-18. Now move your wedge up one set of pegs. Place the extra loop beside the first wedge peg onto the empty peg beside the wedge peg. Now place the extra stitch on the 2nd wedge peg on the empty peg beside the 2nd wedge peg. Pic 19-23. You have now increased by 2.
K: Flat Knit: Process of tossing bottom loop over the top loop.
K2tog: Knit 2 Stitches Together: Process of tossing 2 loops over the top working strand.
TK: Twin Knit: Pull the previous stitch back, place the working yarn in front of the peg, and put the previous stitch back as it was.
P: Purl: Process of pulling working yarn from the bottom of the stitch through to the top, take existing stitch off, and place the new stitch on
DSCO: Draw String Cast On: Weave the working yarn back and forth between the pegs, every other peg should be empty. The take the working yarn and lay it over the empty pegs and toss the pegs with loops over on the pegs with loops.

DSBO: Draw String Bind Off: Send tail through every other stitch and take the stitch off after you send the tail through. After the first round you should have half the pegs with stitches and half without. Then send the tail through the remaining stitches.


Sphere

 DSCO 24 pegs Circular
Row 1-3: K
Row 4: WI 4, and K
Row 5-7: K
Row 8: WI 4, and K
Row 9-11: K
Row 12: WI 4, and K
Row 13-18: K
Row 19: WD 4, and K
Row 20-22: K
Row 23: WD 4, and K
Row 24-26: K
Row 27: WD 4, and K
Row 28-30: K
DSBO
Stuff and close up ends. 
How to make larger. For every increase double the rows you do between your increase and decrease sections. Example here we are doing 3 increases so we will do 6 rows. Lets say you do 7 increases you would do 14 rows between your increase and decrease sections. There are always 3 rows between your decrease and increases.  


Cone

DSCO 24 pegs circular
Row 1-3: K
Row 4: WI 4, and K
Row 5-7: K
Row 8: WI 4, and K
Row 9-11: K
Row 12: WI 4, and K
Row 13: P
Row 14-28: K
Row 29: WD 4, and K
Row 30-44: K
Row 45: WD 4, and K
Row 46-60: K
Row 61: WD 4, and K
DSBO
Place in a flat foam or cardboard circle at the bottom stuff and close up top. 

General rule follow the beginning like normal, you can make larger by simply increasing more. Alway Purl 1 row before you start doing the top of the cone. If you want a sharper point at the top of your cone do 7 rows knit after the very last decrease row. If you want a fatter cone do 10 rows between decreases instead of 15 rows.

Cylinder

 DSCO 24 pegs circular
Row 1-3: K
Row 4: WI 4, and K
Row 5-7: K
Row 8: WI 4, and K
Row 9-11: K
Row 12: WI 4, and K
Row 13: P
Row 14-43: K
Row 44: P
Row 45: WD 4, and K
Row 46-48: K
Row 49: WD 4, and K
Row 50-52: K
Row 53: WD 4, and K
Row 54-56: K
DSBO
Have 2 cardboard or foam circles, put 1 circle in and stuff put the other in and close up ends. 
 You can increase or decrease more to make larger and you always do a purl after you increase and a purl row before you start to decrease. You can do however many rows you want between your purl rows. I did 30 above but you can do more or less depending on what you want. 

Useful Tips

Take the option of removing the bottom sections or top sections of these shapes or combine the shapes to create stuffed animals. You can do the sphere and when you go to decrease switch to the cone to create a head with a pointy hat. You can do the cylinder and not do the decrease section and create a body. You can also do a sphere but do a lot more rows between your increases and decreases to create a leg or arm. Have fun and create what you want using these 3 basic shapes on the X loom. 

Saturday, November 10, 2018

Tips and Techniques to Using the Universal X Loom


WD: Wedge Decrease: First step is to move your wedge down one notch to the next set of pegs. Then move the last set of stitches over to the wedge pegs on each side. Then knit the 2 stitches together on the wedge pegs. 

WI: Wedge Increase: Requires several steps. Twin knit the 1st wedge peg, move the stitch you just made to the previous peg. Pic 1-6. Now knit the 2 wedge pegs. Pic 7-10. Twin knit the next peg beside the wedge peg, move the stitch you just created to the 2nd wedge peg. Knit the peg beside the second wedge peg you just twin knitted. Pic 11-18. Now move your wedge up one set of pegs. Place the extra loop beside the first wedge peg onto the empty peg beside the wedge peg. Now place the extra stitch on the 2nd wedge peg on the empty peg beside the 2nd wedge peg. Pic 19-23. You have now increased by 2.

DW CO: Double Wrap Cast On: Process of E-Wrapping the peg twice and tossing the bottom loop over the top. Great for an EFG loom cast on.

K: Flat Knit: Process of tossing bottom loop over the top loop.

K2tog: Knit 2 Stitches Together: Process of tossing 2 loops over the top working strand.
TK: Twin Knit: Pull the previous stitch back, place the working yarn in front of the peg, and put the previous stitch back as it was.
P: Purl: Process of pulling working yarn from the bottom of the stitch through to the top, take existing stitch off, and place the new stitch on.
BO: Bind Off: Knit pegs 1 and 2, place loop 2 on peg 1, and toss bottom loop over. Move loop back to peg 2. Knit 2nd stitch, move to peg 1, and toss bottom loop over. Move stitch to peg 2. Repeat from the knit 2nd stitch, move to peg 1, and toss bottom loop over, till you have no more stitches left on the loom. 
DSCO: Draw String Cast On: Weave the working yarn back and forth between the pegs, every other peg should be empty. The take the working yarn and lay it over the empty pegs and toss the pegs with loops over on the pegs with loops.

DSBO: Draw String Bind Off: Send tail through every other stitch and take the stitch off after you send the tail through. After the first round you should have half the pegs with stitches and half without. Then send the tail through the remaining stitches.


Casting on, casting onto the X loom you are simply following the edge of the loom all the way around.

For easier knitting. If knitting on a table, find a high table to knit on closer to eye level. The X loom is easier knitting in your lap. Also if you are knitting counterclockwise you need to have your yarn on the right side. If you are knitting clockwise you need your yarn on the left side. If you are knitting flat having the yarn in front of you is best. If on a table knitting flat, in front and elevated above the work is where the yarn should be. Allow yourself several projects to get used to the feel of looming with this loom. Also you don't need to always have the 4 wedges equally away from the middle. See video for well setting up wedges on the looms for quick tricks.


Sunday, November 4, 2018

The Universal X Loom!!!


Universal X Loom

Designed by Scarlett Royale

The Loom Muse

Modified and Made by

CinDwood Looms

No other loom on the market like it!!!


Looking at this loom you may ask "What is so special about this loom?" Everything!!! It can increase and decrease in 4 directions allowing for a smoother shape in finishing hats, socks, and stuffed animals. It allows for a galore of different ways to shape garments. Suddenly loom knitting isn't the same any more. This loom will open a can of beautiful unicorns when designers start to get a hold of this loom!!

There has been a question about the opening in the middle on the prongs. That measurement is 3/4" for the 3/8" and 1/2" gauge and for the 5/8" gauge it is a full 1" space in the middle.

Now asking about specks on these looms... 

120 total pegs
104 pegs maxed out with wedges
24 pegs minimum with wedges
32 pegs on a single prong 
Panel without wedges in flat knit approximately  24"
Panel with wedges in flat knit approximately 21"
160 total pegs
144 pegs maxed out with wedges
24 pegs minimum with wedges
40 pegs on a single prong
Panel without wedges in flat knit approximately 32"
Panel with wedges in flat knit approximately 29"
128 total pegs
112 pegs maxed out with wedges
24 pegs minimum with wedges
32 pegs on a single prong
Panel without wedges in flat knit worsted weight 32" 
Panel with wedges in flat knit worsted weight 28"
Panel without wedges in e-wrap super bulky 42.6"
Panel with wedges in e-wrap super bulky 37.3"
96 total pegs
80 pegs maxed out with wedges
24 pegs with wedges minimum
24 pegs on a single prong
Panel without wedges will be flat knit worsted weight 24" wide
Panel with wedges maxed out will flat knit worsted weight 20" wide
Panel without wedges in e-wrap super bulky 32" wide
Panel with wedges maxed out e-wrap super bulky 27"

176 pegs total
160 pegs wedges maxed out
24 peg with wedges at minimum
44 pegs on a single prong
Panel without wedges will be flat knit worsted weight 44" wide
Panel with wedges maxed out will flat knit worsted weight 40" wide
Panel without wedges in e-wrap super bulky 58" wide
Panel with wedges maxed out e-wrap super bulky 53"

144 pegs total
128 pegs wedges maxed out
16 pegs with wedges at minimum
36 pegs on a single prong  
Panel without wedges will be flat knit worsted weight 48" wide
Panel with wedges maxed out will flat knit worsted weight 43" wide
Panel without wedges in e-wrap super bulky 58" wide
Panel with wedges maxed out e-wrap super bulky 51" wide
104 total pegs
100 pegs maxed out with wedges
16 pegs minimum with wedges
26 pegs on a single prong
Panel without wedges in flat knit super bulky 36"
Panel with wedges in flat knit super bulky 33"
Panel without wedges in e-wrap super bulky 43.2"
Panel with wedges in e-wrap super bulky 40"

72 total pegs
56 pegs maxed out wedges
16 pegs minimum with wedges
18 pegs on a single prong
Panel without wedges in flat knit super bulky 24"
Panel with wedges in flat knit super bulky 18"
Panel without wedges in e-wrap super bulky 29"
Panel with wedges in e-wrap super bulky 22"

Basic Swatching for the gauges and yarns
3/8" gauge
worsted weight swatch 5 SPI and 9 RPI in flat knit
DK weight swatch 6 SPI and 10 RPI in flat knit

1/2" gauge
worsted weight swatch 4 SPI and 7 RPI in flat knit
bulky weight swatch 4 SPI and 5.5 RPI in flat knit
super bulky swatch 3 SPI and 5 RPI in flat knit
super bulky swatch 3 SPI and 4 RPI in e-wrap

5/8" gauge
super bulky swatch 3 SPI and 5 RPI in flat knit
super bulk swatch 2.5 SPI and 3 RPI in e-wrap

What can you make with this style loom? Anything, and I mean anything. No peg limits any more. If you work a project up, and you need say 14 pegs you can set a wedge and prong up for 14 pegs. If you need say 98 pegs you can set all 4 of the wedges up for 98 pegs. This means you have unlimited ways of working with this loom. If you are on a budget and need to choose just one loom, this would be it.    

While this may seem pricey, if you are new to the Cindwood Loom Company they have all there bases made in house and they hand glue in every single peg. They are a fast growing small business that create high quality looms, and have great customer service. Most who get their hands on any of their looms are in love with the brand. This is well worth the money for the freedom and quality of this loom. Plus you support an American business not a corporate giant. 

You will be seeing more patterns in the future done on the x loom from me and other Cindwood loom designers. Just keep an eye out on their website and my ravelry store.