The Muse Scarlett Yvette Royal

The Muse Scarlett Yvette Royal

Thursday, October 9, 2014

Purchase a Realistic Owl Hat

This is the $40 dollar snow owl hat. Simple and less ridges.
 This is the size large hat, completed in Lions Brand Homespun Yarn. You can ask for this option of yarn if you would like.
 This is a kind of fun version of the hat, done in large, and a netted technique for the back. This would be an $80 hat if you wanted the netted technique with beads added.
 This was a hat completed in wool yarn, if you would like wool yarn you must add an extra $7 to your order.
This is a version of the snow owl hat with a crocodile stitch, this is $80 dollars as well if you want this particular stitch. You can still get a snow owl hat for cheaper, just keep the face area and smooth out the back of the hat. 
 If you put no yarn specifics in this is the hat you are ordering for the great horned owl. Periodically I will be adding in pictures of hats as they get made. I will also be adding in the size variations as well as the style differences. Still need to add the snow owl and fun owl hat to pictures.


If you would like to purchase a Realistic Owl Hat, here are a few things to know.

1.When ordering an Owl hat allow 2-3weeks to complete and ship out the hat, the reason being is that these hats are made on demand, when you order, that is when they get put down to be made. So if you are considering ordering one for a Christmas gift, please put in your order now to be sure it is ready for Christmas. As of this very minute the hat would get to you faster than 2 weeks, but this can be subject to change depending on orders, if they start to add up quickly.

2. I customize size, color, and yarn. If you want a smaller size naturally it is cheaper, but will typically fit a baby to a child. The standard size fits and older child to adult woman, and the large size fits adult woman to mens. If you want the fun color choice option you need to send me a message telling me your 3 colors. These colors need to include a dark, medium, and light color. The great horned owl is the standard, the snow owl will be white with a slight variation, and the fun color one is what you choose. Lastly if you want a natural fiber for your yarn please send me a message, this will increase the price by $5, maybe more if you want a specialty fiber that is expensive.

3. This is an original design, so you won't see this walking around everywhere on peoples heads.


Sizes
Colors
Made On Demand

Thursday, October 2, 2014

How to Loom Knit Gloves Round Loom


Gloves on Round Looms

Supplies:
31 peg loom
looming hook
crafters needle
crochet hook
1 skein of 4ply yarn

Terms:
DSCO:Draw String Cast On
K: Knit
P: Purl
D: Decrease
COF: Cast Off

31 peg loom: fingers to base
Index Finger
DSCO 9 pegs
Row 1-15: K9 (Half finger, K9 11 rows)
(Move your end loops in by 1 peg. Looks like a decrease but we aren't decreasing)
Middle Finger
DSCO 5 pegs
Row 1-21: K5 (Half finger, K5 15rows)
(Move your loop from your index finger back to where it was, the move your loop on the other end in by one peg to prep for the ring finger. We will be doing this concept all the way around, with each finger.)
Ring Finger
DSCO 5 pegs
Row 1-17: K5 (Half finger, K5 11 rows)
Repeat step above on moving your end loops around.
Pinky Finger
DSCO 8 pegs
Row 1-15: K8 (Half finger, K8 9 rows)
Repeat step above on moving your end loops around.
Ring Finger
DSCO 5 pegs
Row 1-17: K5 (Half finger, K5 11 rows)
Repeat step above
Middle Finger
DSCO 5 pegs
Row 1-21: K5 (Half finger, K5 15 rows)
Move your index finger loop back over  and now you can start working circularly. It is okay if you didn't cut your yarn when adding the fingers. You can cut that later.
Now working the upper part of the hand
Row 1-15: K31
Row 16: K2 (Thumb K5 29rows, flat) K22 (Half finger Thumb, K5 11rows, K2, D1 K1, K1, K5 11 rows)
Row 17-23: K31
Row 24: K20
Row 25: D1 K1, K29 (30)
Row 26: D1 K1, K26, D1 K1 (28)
Row 27: D1 K1, K24, D1 K1 (26)
Row 28: D1 K1, K22, D1 K1 (24)
Row 29: K1, P1 11times
Row 30: P1, K1 11times
Row 31-38: Repeat rows 29 and 30 4times
COF
Turn inside out. Sew up cuff and gather the stiches around the decreased area.  Sew up your thumb area. Now Tighten your Cast on with all your finger ends. The cut the extra dangling strings in half. Use these strings to tie your fingers in place to prep to sew all your fingers together. After you do that, sew all your fingers up at once, and snip all your extra yarn and flip right side out. Make 2 and your done.  If you made the half fingers you will need to crochet and edge around the tops of the finger holes. Also would suggest an EW CO rather than a Draw String Cast On.

 A wonderful subscriber decided to take his own time and effort to write out and write up a larger pattern size for gloves on a round loom. Below are his notes.


Gloves on Green Round Loom
Original Pattern by Scarlett Royale, Modified for larger hand by chuckiedoodle
Page 1 of 3
How to Loom Knit Gloves Round Loom
Supplies:
36 peg loom
looming hook
crafters needle
crochet hook
1 skein of 4ply yarn
Terms:
DSCO:Draw String Cast On
K: Knit (Flat Stitch)
P: Purl
R: Decrease each end
SSBOF: Super Stretchy Bind Off
36 peg loom: Working Flat Entire Project
Finger Section
Pinky Finger
DSCO 5 pegs
Row 1-15: K5
(Move your end loop in by 1 peg. Looks like a decrease but we aren't decreasing)
Ring Finger
DSCO 5 pegs
Row 1-17: K5
Move Ring Finger end loop in (Peg 9 to Peg 8) and place Pinky Finger end loop,
currently on Peg 4, on Peg 5. Do this loop shuffle after every finger.
Middle Finger
DSCO 5 pegs
Row 1-21: K5
Repeat step above on moving your end loops around.


Gloves on Green Round Loom
Page 2 of 3
Index Finger DSCO 9 pegs
Row 1-17: K9
Repeat step above on moving your end loops around.
Middle Finger
DSCO 5 pegs
Row 1-21: K5
(Repeat step above on moving your end loops around.
Ring Finger
DSCO 5 pegs
Row 1-17: K5
Repeat step above on moving your end loops around.
Pinky Finger
DSCO 5 pegs
Row 1-15: K5
Repeat step above on moving your end loops around.
End of Finger Section
Hand Section
Row 1-15: K33
Thumb
Row 16: Line up Thumb with Index Finger … Pegs 14 - 19
Row 1-29 K6
Then knit to row end
Row 17-23 K33 (7 rows)
Row 24: R1 K31
Row 25: R1 K29
Row 26: R1 K27
Row 27: R1 K25
End of Hand Section
Wrist Section
Row 28-37: K1P1 Ribbing for 10 rows
SSBOF
Basic Bind Off with an extra e-wrap between pegs will work, but the SSBOF looks
better and is more comfortable.


Gloves on Green Round Loom
Page 3 of 3
Turn inside out, and sew/lace the glove, fingers and thumb.
Do yourself a huge favor and watch the Glove Knit Along link called out below.
This pattern is based on her video and has just been modified to better fit a man’s
hand. Green Loom vice Red Loom for a little extra finger room, et al.
Her video gives a lot of tips and tricks for the lace up of the glove, all of which are
applicable for this pattern.
——————Her original text—————-
Turn inside out. Sew up cuff and gather the stitches around the decreased area. 
Sew up your thumb area. Now Tighten your Cast on with all your finger ends. The
cut the extra dangling strings in half. Use these strings to tie your fingers in place
to prep to sew all your fingers together. After you do that, sew all your fingers up at
once, and snip all your extra yarn and flip right side out. Make 2 and your done. 
——————End original text—————-
Links:
Glove Knit Along: http://theideasandcreationsfromthemuse.blogspot.com/
2014_10_01_archive.html
Super Stretchy Bind Off: https://www.youtube.com/watch?v=O_zpxFSSJcg

Thursday, September 25, 2014

Realistic Owl Hat Pattern


With this pattern you will receive through your e-mail a PDF file of the pattern written out, as well as 2 links to the private Youtube tutorial and tips videos. All for just $2. Please make sure you include your Youtube e-mail address so that I can add you to the list to be able to see the videos, it is a private video and the only thing your e-mail will be used for is adding you to the list to see the video. I have no need to spam you, I don't have the time for that nonsense. 


Realistic Owl Hat Pattern

Saturday, September 20, 2014

Victorian Beanie Hat


Victorian Beanie Hat

Supplies
2 Skeins color of choice
41 Peg Loom
Crafters Needle
Looming Hook

Stitches
Draw String Cast Off : DSCOF
E-Wrap: EW
CO: Cast On

Hat: Yellow Loom: Work Circular
EW CO 41 pegs
Row 1-10: EW41
Work Flat pegs 1-35
Row 11: EW35 Row 12: EW34
Row 13: EW 33 Row 14: EW 32
Row 15: EW 31 Row 16: EW 30
Row 17: EW 29 Row 18: EW 28
Row 19: EW 27 Row 20: EW 26
Row 21: EW 25 Row 22: EW 24
Row 23: EW 23 Row 24: EW 22
Row 25: EW 21 Row 26: EW 20
Row 27: EW 19 Row 28: EW 18
Row 29: EW 17 Row 30: EW 16
Row 31: EW 15 Row 32: EW 14
Row 33: EW 13 Row 34: EW 12
Row 35: EW 11 Row 36: EW 10

Put your cast on loops onto the pegs to create a brim. 

Row 37-52: EW41
DSCOF


Add Roses and leaves if desired.


Ski Mask


Ski Mask

Supplies:
 41 peg Circular Loom
Crafting Needle
Looming Hook
Crochet Hook
Two Skeins Color of Choice

Stitches Used:
E-Wrap: EW
Purl: P
K: Knit
Cast On: CO
Cast Off: COF
Draw String Cast On: DSCO

Top of Hat: Yellow Loom
DSCO 41 pegs Start off working circularly
Row 1-15: EW41
Row 16: COF 11, EW30
Row 17-19: Start working flat EW30
Row 20: Go back to working circular CO11, EW30


Mid Hat
Row 21-22: EW25, P2, EW14
Row 23-24: EW23, P1, EW1, P2, EW1, P1, EW12
Row 25-26: EW21, P1, EW1, P1, EW1, P2, EW1, P1, EW1, P1, EW10
Row 27-28: EW19, P1, EW1, P1, EW1, P1, EW1, P2, EW1, P1, EW1, P1, EW1, P1, EW8
Row 29-30: EW17, P1, EW1, P1, EW1, P1, EW1, P1, EW1, P2, EW1, P1, EW1, P1, EW1, P1, EW1, P1, EW6

Neck of Hat: At this point you can change color if you would like.
Row 31-49: K1, P1 12times, K1, P2,  Then K1, P1 7times
COF Loosely


Finishing:
Draw String the top of the hat. Crochet around the edge of eye area to stiffen and clean the line. If desired to be warmer, line with a thin yarn, only work lining to mid hat section and not doing the neck, sew lightly the lining into the hat.


Thursday, September 18, 2014

How to Loom Knit Horns and Spikes


How to Loom Knit Horns and Spikes

Items Needed:
24 peg loom
looming hook
crafters needle
crochet hook
polyfil
yarn

Terms:
CO- Cast On
EW- E-Wrap
P- Purl
D- Decrease
ID: Internal Decrease
COF- Cast Off

Large Horns: 18 pegs: Flat
EW CO 18 pegs
Row 1-6: EW18
Row 7: D1 EW1, EW14, D1 EW1 (16)
Row 8-11: EW16
Row 12: D1 EW1, EW12, D1 EW1 (14)
Row 13-14: EW14
Row 15: D1 EW1, EW10< D1 EW1 (12)
Row 16-17: EW12
Row 18: ID 12 to 6 pegs
Row 19-22: EW6
Row 23: D1 EW1, EW2, D1 EW1 (4)
Row 24-27: EW4
Row 28: D1 EW1, D1 EW1 (2)
Row 29: EW2
Row 30: D1 EW1 (1)
Snip end pull through, sew up, stuff, make 2.


Small Horns: 12 pegs: Flat
White yarn first
EW CO 12 pegs
Row 1: EW12
Row 2: EW3 3rows, EW1 3rows, EW3 3rows (Repeat this 4 total times, it is like doing the spikes)
Fold up your cast on loops like when creating a brim.
Row 3: EW12
Change color to yellow
Row 4-6: EW12
Row 7: D1 EW1, EW8, D1 EW1 (10 pegs)
Row 8-10: EW10
Row 11: D1 EW1, EW6, D1 EW1 (8 pegs)
Row 12-13: EW8
Row 14: D1 EW1, EW4, D1 EW1 (6 pegs)
Row 15-16: EW6
Row 17: D1 EW1, EW2, D1 EW1 (4 pegs)
Row 18-19: EW4
Row 20: D1 EW1, D1 EW1 (2 pegs)
Row 21-22: EW2
Row 23: D1 EW1
Snip end, pull through, sew up horn and stuff. Make 2.


Spikes: 24 pegs: Flat:
EW CO 24 pegs
Row 1: EW24
Row 2: EW4 4rows, EW2 3 rows, EW4 4 rows (Repeat this 6 times total)
Fold cast on loops back onto pegs like when making a brim.
Row 3: EW24
COF

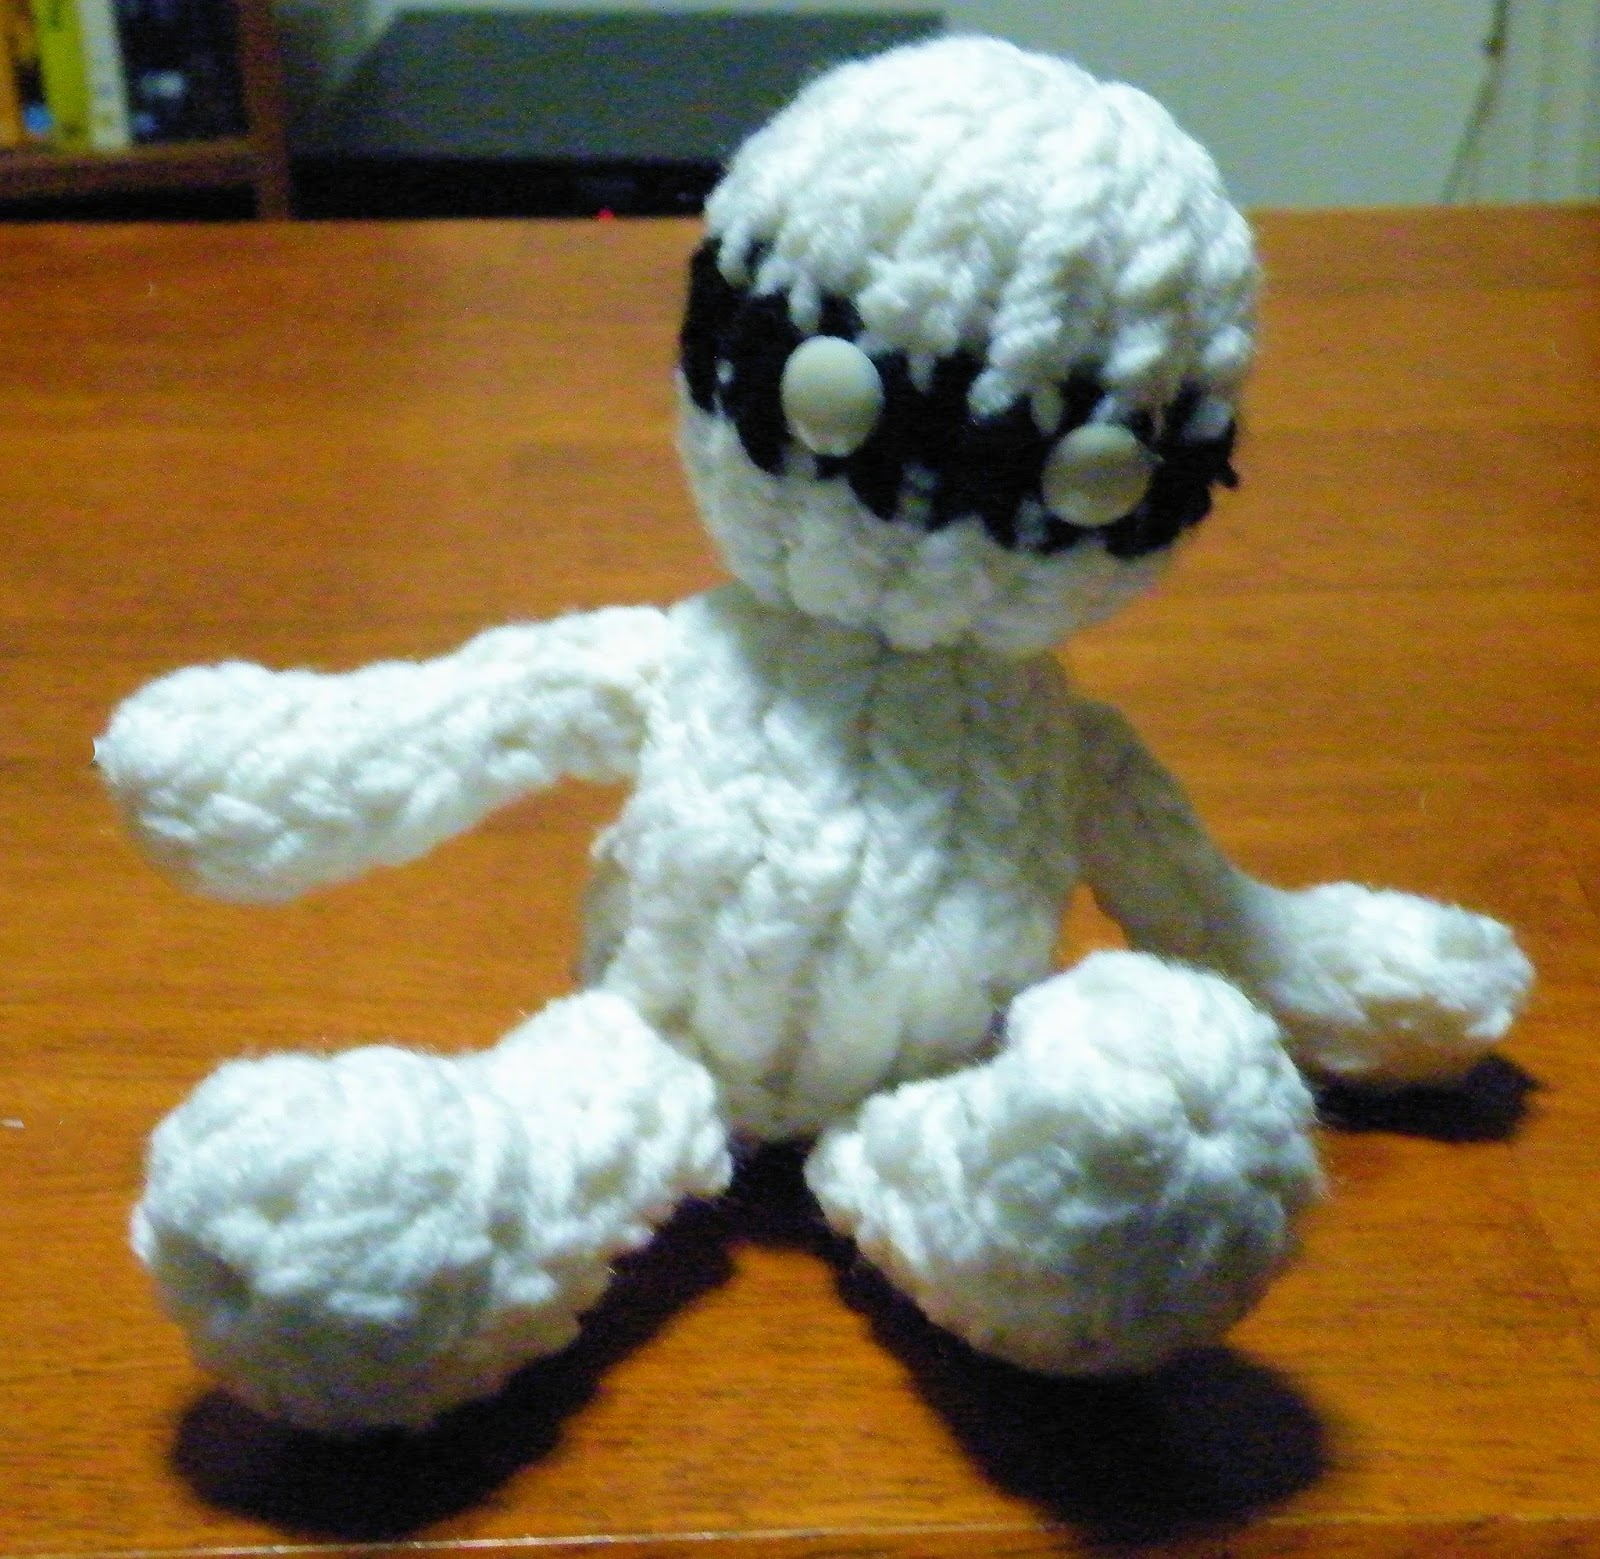
How to Loom Knit a Little Mummy


Little Mummy

Items:
12 peg loom
white yarn (Yarn can be scrap)
black yarn (Yarn can be scrap)
looming hook
crafters needle
crochet hook
2 white eyes
polyfil

Terms:
DSCO: Draw String Cast On
EW: E-Wrap
P: Purl
D: Decrease
WT: Wrap and Turn
CC: Change Colo
B: Black Yarn
W: White
DSCOF: Draw String Cast Off
COF: Cast Off

Head: Circular: 12 pegs:
DSCO 12 pegs
Row 1-5: EW12
Row 6-8: CC B EW8, CC W EW4
Row 9-13: CC W EW12
COF
Stuff, close the top of the head by pulling the drawstring.

Body: Circular: 12 Pegs
DSCO 12 pegs
Row 1-3: EW12
Row 4: P12
Row 5-7: EW12
Row 8: EW7 WT, EW6 WT, EW5 WT, EW4, EW5, EW6, EW7, EW12
Row 9-14: EW12
COF
Stuff, close the bottom.

Arms: Flat: 8 pegs
DSCO 8 pegs
Row 1-4: EW8
Row 5: D1 EW1, 4, D1 EW1
Row 6-8: EW6
Row 9: D1 EW1, EW2, D1 EW1
Row 10-15: EW6
COF
Draw String the hand and sew up the front of the arm. Stuff, and make 2.

Legs: Flat: 12 pegs
DSCO 12 pegs
Row 1-4: EW12
Row 5: D1 EW1, EW 8, D1 EW1
Row 6: EW10
Row 7: D1 EW1, EW 6, D1 EW1
Row 8-9: EW8
Row 10: D1 EW1, EW4, D1 EW1
Row 11-16: EW6
COF
Draw string the foot and sew up the front of the leg. Stuff and make 2.

Essembling:
Sew head on, black section facing the same direction as the belly area. Then sew on the legs onto the purled line under the belly area. Then sew on the arms on the side at the very top of the body. Hot glue or sew in your white eyes in the black section, and you have your little mummy.