The Muse Scarlett Yvette Royal
Thursday, September 25, 2014
Realistic Owl Hat Pattern
With this pattern you will receive through your e-mail a PDF file of the pattern written out, as well as 2 links to the private Youtube tutorial and tips videos. All for just $2. Please make sure you include your Youtube e-mail address so that I can add you to the list to be able to see the videos, it is a private video and the only thing your e-mail will be used for is adding you to the list to see the video. I have no need to spam you, I don't have the time for that nonsense.
Saturday, September 20, 2014
Victorian Beanie Hat
Supplies
2 Skeins color of
choice
41 Peg Loom
Crafters Needle
Looming Hook
Stitches
Draw String Cast Off
: DSCOF
E-Wrap: EW
CO: Cast On
Hat: Yellow Loom:
Work Circular
EW CO 41 pegs
Row 1-10: EW41
Work Flat pegs 1-35
Row 11: EW35 Row 12: EW34
Row 13: EW 33 Row 14: EW 32
Row 15: EW 31 Row 16: EW 30
Row 17: EW 29 Row 18: EW 28
Row 19: EW 27 Row 20: EW 26
Row 21: EW 25 Row 22: EW 24
Row 23: EW 23 Row 24: EW 22
Row 25: EW 21 Row 26: EW 20
Row 27: EW 19 Row 28: EW 18
Row 29: EW 17 Row 30: EW 16
Row 31: EW 15 Row 32: EW 14
Row 33: EW 13 Row 34: EW 12
Row 35: EW 11 Row 36: EW 10
Put your cast on loops onto the pegs to create a brim.
Row 37-52: EW41
DSCOF
Add Roses and leaves if desired.
Ski Mask
Ski Mask
Supplies:
41 peg Circular Loom
Crafting Needle
Looming Hook
Crochet Hook
Two Skeins Color of
Choice
Stitches Used:
E-Wrap: EW
Purl: P
K: Knit
Cast On: CO
Cast Off: COF
Draw String Cast On:
DSCO
Top of Hat: Yellow
Loom
DSCO 41 pegs Start off working circularly
Row 1-15: EW41
Row 16: COF 11, EW30
Row 17-19: Start working flat EW30
Row 20: Go back to working circular CO11, EW30
Mid Hat
Row 21-22: EW25, P2, EW14
Row 23-24: EW23, P1, EW1, P2, EW1, P1, EW12
Row 25-26: EW21, P1, EW1, P1, EW1, P2, EW1, P1, EW1, P1,
EW10
Row 27-28: EW19, P1, EW1, P1, EW1, P1, EW1, P2, EW1, P1, EW1,
P1, EW1, P1, EW8
Row 29-30: EW17, P1, EW1, P1, EW1, P1, EW1, P1, EW1, P2, EW1,
P1, EW1, P1, EW1, P1, EW1, P1, EW6
Neck of Hat: At this point you can change color if you would like.
Row 31-49: K1, P1 12times, K1, P2, Then K1, P1 7times
COF Loosely
Finishing:
Draw String the top of the hat. Crochet around the edge of
eye area to stiffen and clean the line. If desired to be warmer, line with a
thin yarn, only work lining to mid hat section and not doing the neck, sew
lightly the lining into the hat.
Thursday, September 18, 2014
How to Loom Knit Horns and Spikes
Items Needed:
24 peg loom
looming hook
crafters needle
crochet hook
polyfil
yarn
Terms:
CO- Cast On
EW- E-Wrap
P- Purl
D- Decrease
ID: Internal Decrease
COF- Cast Off
Large Horns: 18 pegs: Flat
EW CO 18 pegs
Row 1-6: EW18
Row 7: D1 EW1, EW14, D1 EW1 (16)
Row 8-11: EW16
Row 12: D1 EW1, EW12, D1 EW1 (14)
Row 13-14: EW14
Row 15: D1 EW1, EW10< D1 EW1 (12)
Row 16-17: EW12
Row 18: ID 12 to 6 pegs
Row 19-22: EW6
Row 23: D1 EW1, EW2, D1 EW1 (4)
Row 24-27: EW4
Row 28: D1 EW1, D1 EW1 (2)
Row 29: EW2
Row 30: D1 EW1 (1)
Snip end pull through, sew up, stuff, make 2.
Small Horns: 12 pegs: Flat
White yarn first
EW CO 12 pegs
Row 1: EW12
Row 2: EW3 3rows, EW1 3rows, EW3 3rows (Repeat this 4 total times, it is like doing the spikes)
Fold up your cast on loops like when creating a brim.
Row 3: EW12
Change color to yellow
Row 4-6: EW12
Row 7: D1 EW1, EW8, D1 EW1 (10 pegs)
Row 8-10: EW10
Row 11: D1 EW1, EW6, D1 EW1 (8 pegs)
Row 12-13: EW8
Row 14: D1 EW1, EW4, D1 EW1 (6 pegs)
Row 15-16: EW6
Row 17: D1 EW1, EW2, D1 EW1 (4 pegs)
Row 18-19: EW4
Row 20: D1 EW1, D1 EW1 (2 pegs)
Row 21-22: EW2
Row 23: D1 EW1
Snip end, pull through, sew up horn and stuff. Make 2.
Spikes: 24 pegs: Flat:
EW CO 24 pegs
Row 1: EW24
Row 2: EW4 4rows, EW2 3 rows, EW4 4 rows (Repeat this 6 times total)
Fold cast on loops back onto pegs like when making a brim.
Row 3: EW24
COF
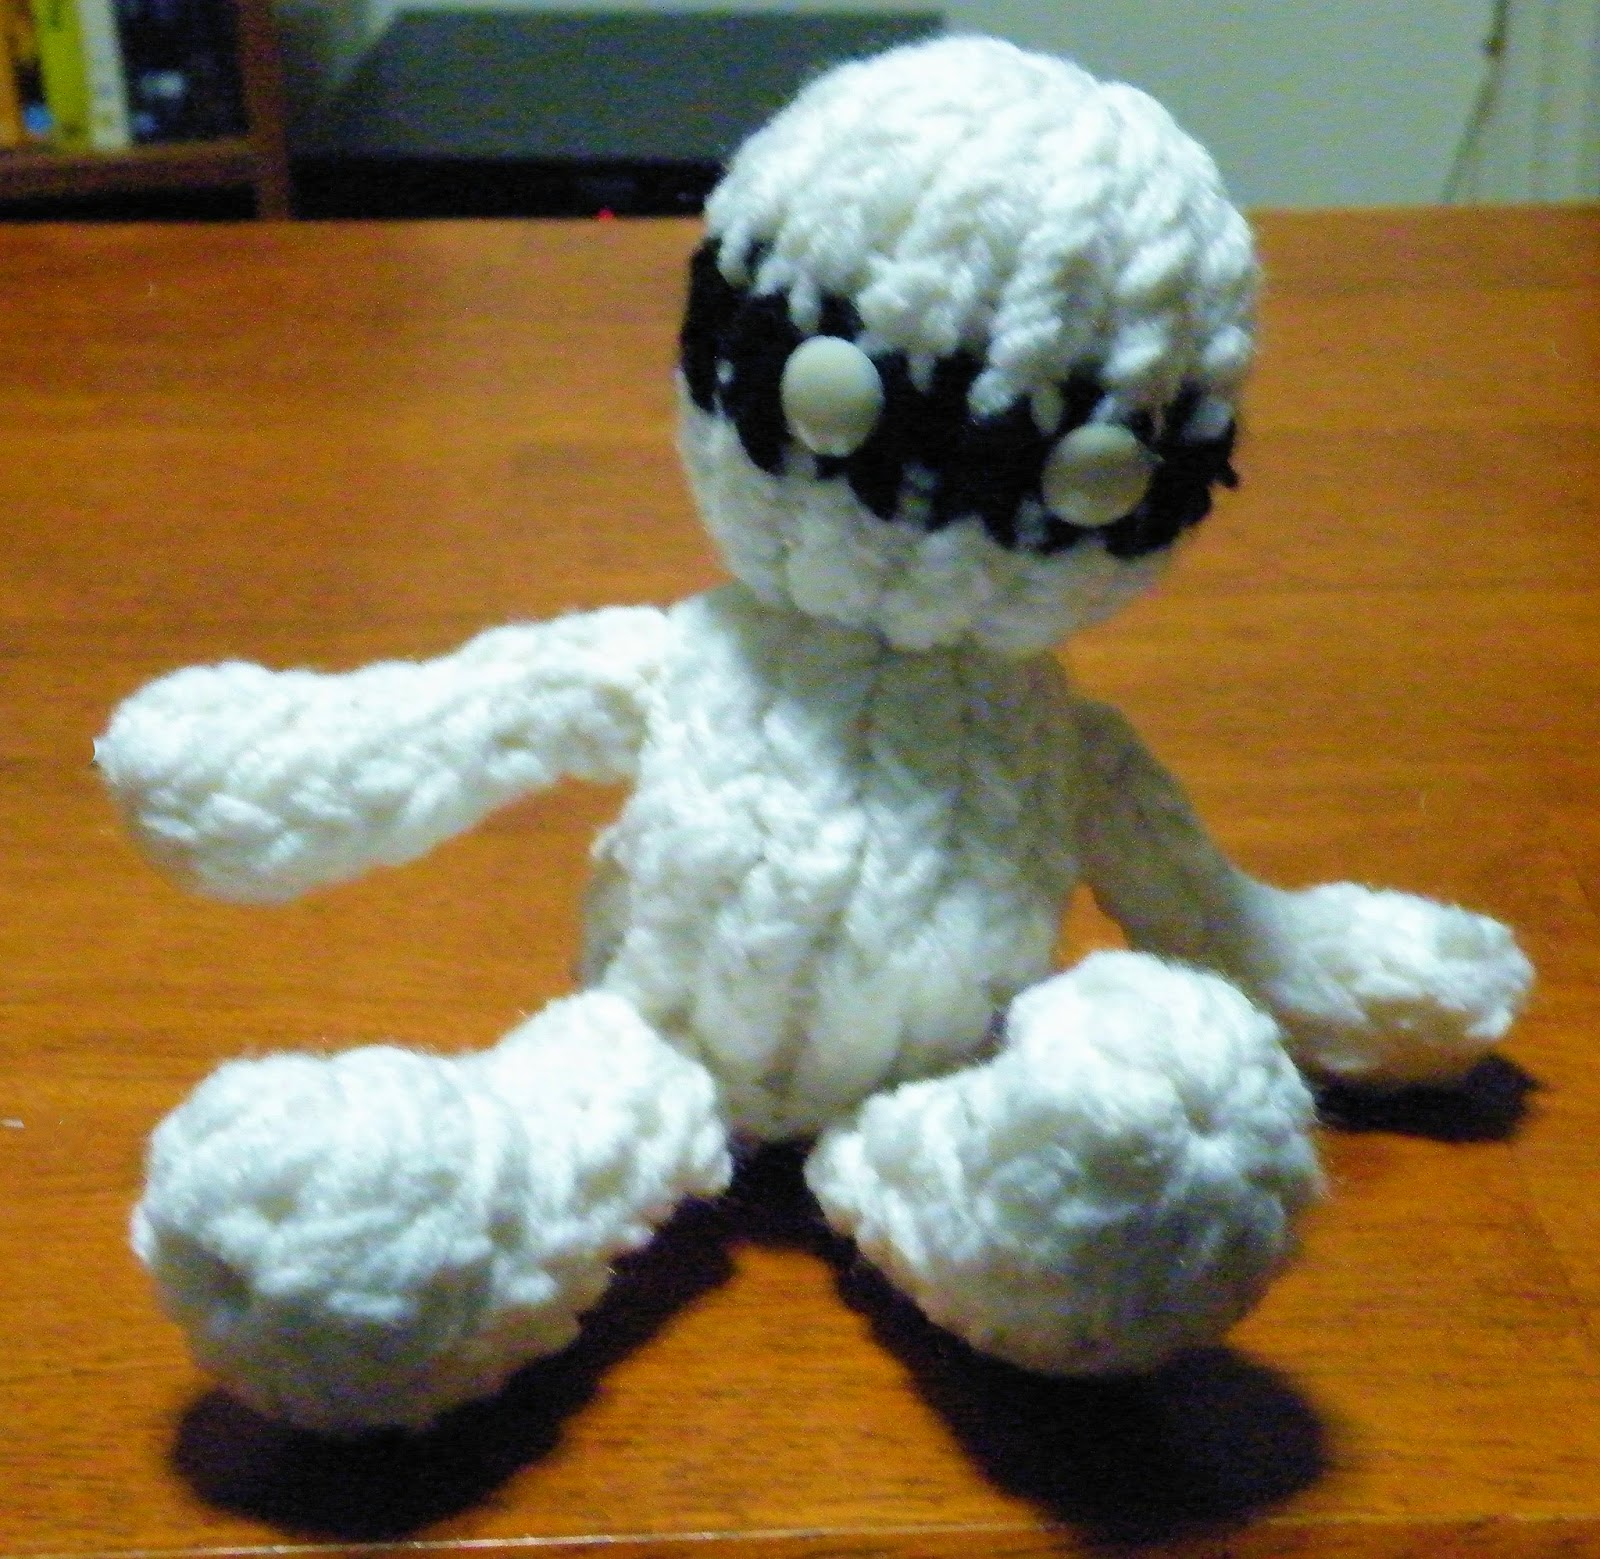
How to Loom Knit a Little Mummy
Little Mummy
Items:
12 peg loom
white yarn (Yarn can be scrap)
black yarn (Yarn can be scrap)
looming hook
crafters needle
crochet hook
2 white eyes
polyfil
Terms:
DSCO: Draw String Cast On
EW: E-Wrap
P: Purl
D: Decrease
WT: Wrap and Turn
CC: Change Colo
B: Black Yarn
W: White
DSCOF: Draw String Cast Off
COF: Cast Off
Head: Circular: 12 pegs:
DSCO 12 pegs
Row 1-5: EW12
Row 6-8: CC B EW8, CC W EW4
Row 9-13: CC W EW12
COF
Stuff, close the top of the head by pulling the drawstring.
Body: Circular: 12 Pegs
DSCO 12 pegs
Row 1-3: EW12
Row 4: P12
Row 5-7: EW12
Row 8: EW7 WT, EW6 WT, EW5 WT, EW4, EW5, EW6, EW7, EW12
Row 9-14: EW12
COF
Stuff, close the bottom.
Arms: Flat: 8 pegs
DSCO 8 pegs
Row 1-4: EW8
Row 5: D1 EW1, 4, D1 EW1
Row 6-8: EW6
Row 9: D1 EW1, EW2, D1 EW1
Row 10-15: EW6
COF
Draw String the hand and sew up the front of the arm. Stuff, and make 2.
Legs: Flat: 12 pegs
DSCO 12 pegs
Row 1-4: EW12
Row 5: D1 EW1, EW 8, D1 EW1
Row 6: EW10
Row 7: D1 EW1, EW 6, D1 EW1
Row 8-9: EW8
Row 10: D1 EW1, EW4, D1 EW1
Row 11-16: EW6
COF
Draw string the foot and sew up the front of the leg. Stuff and make 2.
Essembling:
Sew head on, black section facing the same direction as the belly area. Then sew on the legs onto the purled line under the belly area. Then sew on the arms on the side at the very top of the body. Hot glue or sew in your white eyes in the black section, and you have your little mummy.
Wednesday, September 17, 2014
How to Loom Knit a Baby Onesie
Baby Sweater Onesie
Items needed:
41 peg loom
24 peg loom
looming hook
crochet hook
crafters needle
2 colors of yarn (Double strands)
8 buttons
Terms:
CO: Cast On
EW: E-Wrap
D: Decrease
P: Purl
COF: Cast Off
CC: Change Color
MC: Main Color
AC: Accent Color
Working from legs to shoulders
Start by working flat.
EW CO AC 21 pegs
Row 1: EW1, P2, EW2, P2, EW2, P2, EW2, P2, EW2, P3, EW1
Row 2: EW1, P3, EW2, P2, EW2, P2, EW2, P2, EW2, P2, EW1
Row 3-6: Repeat rows 1 and 2
Row 7: Repeat row 1
Row 8-26: CC MC and Repeat rows 1 and 2
(Repeat on other half of loom, note yes, you will be overlapping 1 peg. Just make sure to not toss over that original loop. You do you end up connecting the bottom of one leg with the top of the other, you don't want that.)
Starting on the body, start working circular, we are connecting the legs.
Row 27-47: EW1 (P2, EW2 4times) P3 EW1 P3 (EW2, P2 4times) EW1
Row 48-49: CC AC Repeat row 27
Row 50: CC MC Repeat row 27
Row 51-54: CC AC Repeat row 27
Row 55: CC MC Repeat row 27
Row 56-57: CC AC Repeat row 27
Row 58-63: CC MC Repeat row 27
Body done now we start working the upper body which will change us to working flat again. We are going to work the back 1st.
Row 64: EW1, P3, EW2, P2, EW2, P1 (now go back the other direction)
Row 65: P1, EW2, P2, EW2, P3, EW1, P3, EW2, P2, EW2, P1
Row 66-80: Repeat row 65
COF
Going to the other side of the loom, we will now go about completing the front.
Row 64: P1, EW2, P2, EW2, P2, EW1
Row 65: D1 P1, P1, EW2, P2, EW1, D1 EW1 (8)
Row 66: P2, EW2, P2, EW2
Row 67: EW2, P2, EW2, P2
Row 68: Repeat row 66
Row 69: Repeat row 67
Row 70: D1 P1, EW2, P2, D1 EW1 (6)
Row 71: EW1, P2, EW2, P1
Row 72: P1, EW2, P2, EW1
Row 73: Repeat row 71
Row 74: Repeat row 72
Row 75: Repeat row 71
Row 76: D1 P1, P1, EW1, D1 EW1 (4)
Row 77: EW2, P2
Row 78: P2, EW2
Row 79: EW2 P2
Row 80: P2, EW2
COF
Repeat the same on the other side
Sleeves: Circular: 24 pegs
EW CO AC 24 pegs
Row 1-7: EW2 P2 6times
Row 8-28: CC MC EW2 P2 6times
COF
make 2
Collar: Flat: 40 pegs
EW CO AC 40pegs
Row 1: EW2 P2 10times
Row 2: P2 EW2 10times
Row 3-13: Repeat rows 1 and 2
COF
Sew on collar and sleeves. Add 4 buttons to each side of the inner legs on the back side sections. Buttons should go easily through sections on opposite side.
Your done!!!
Sunday, September 14, 2014
How To Loom Knit a Corkscrew
EW CO 6
EW6
Row1: EW6, EW3 2Row, EW4 2Rows, EW5 2Rows, EW6 (Repeat this technique)
If you want to enlarge it make sure to start the pattern at half the amount of pegs and work way back to the beginning. Also feel free to Purl or Knit the rows as well as EW. If you don't want it to curl Purl the next to the last peg on the outer spiral. If you EW double up your yarn.
Subscribe to:
Posts (Atom)