The Muse Scarlett Yvette Royal

The Muse Scarlett Yvette Royal

Tuesday, February 17, 2015

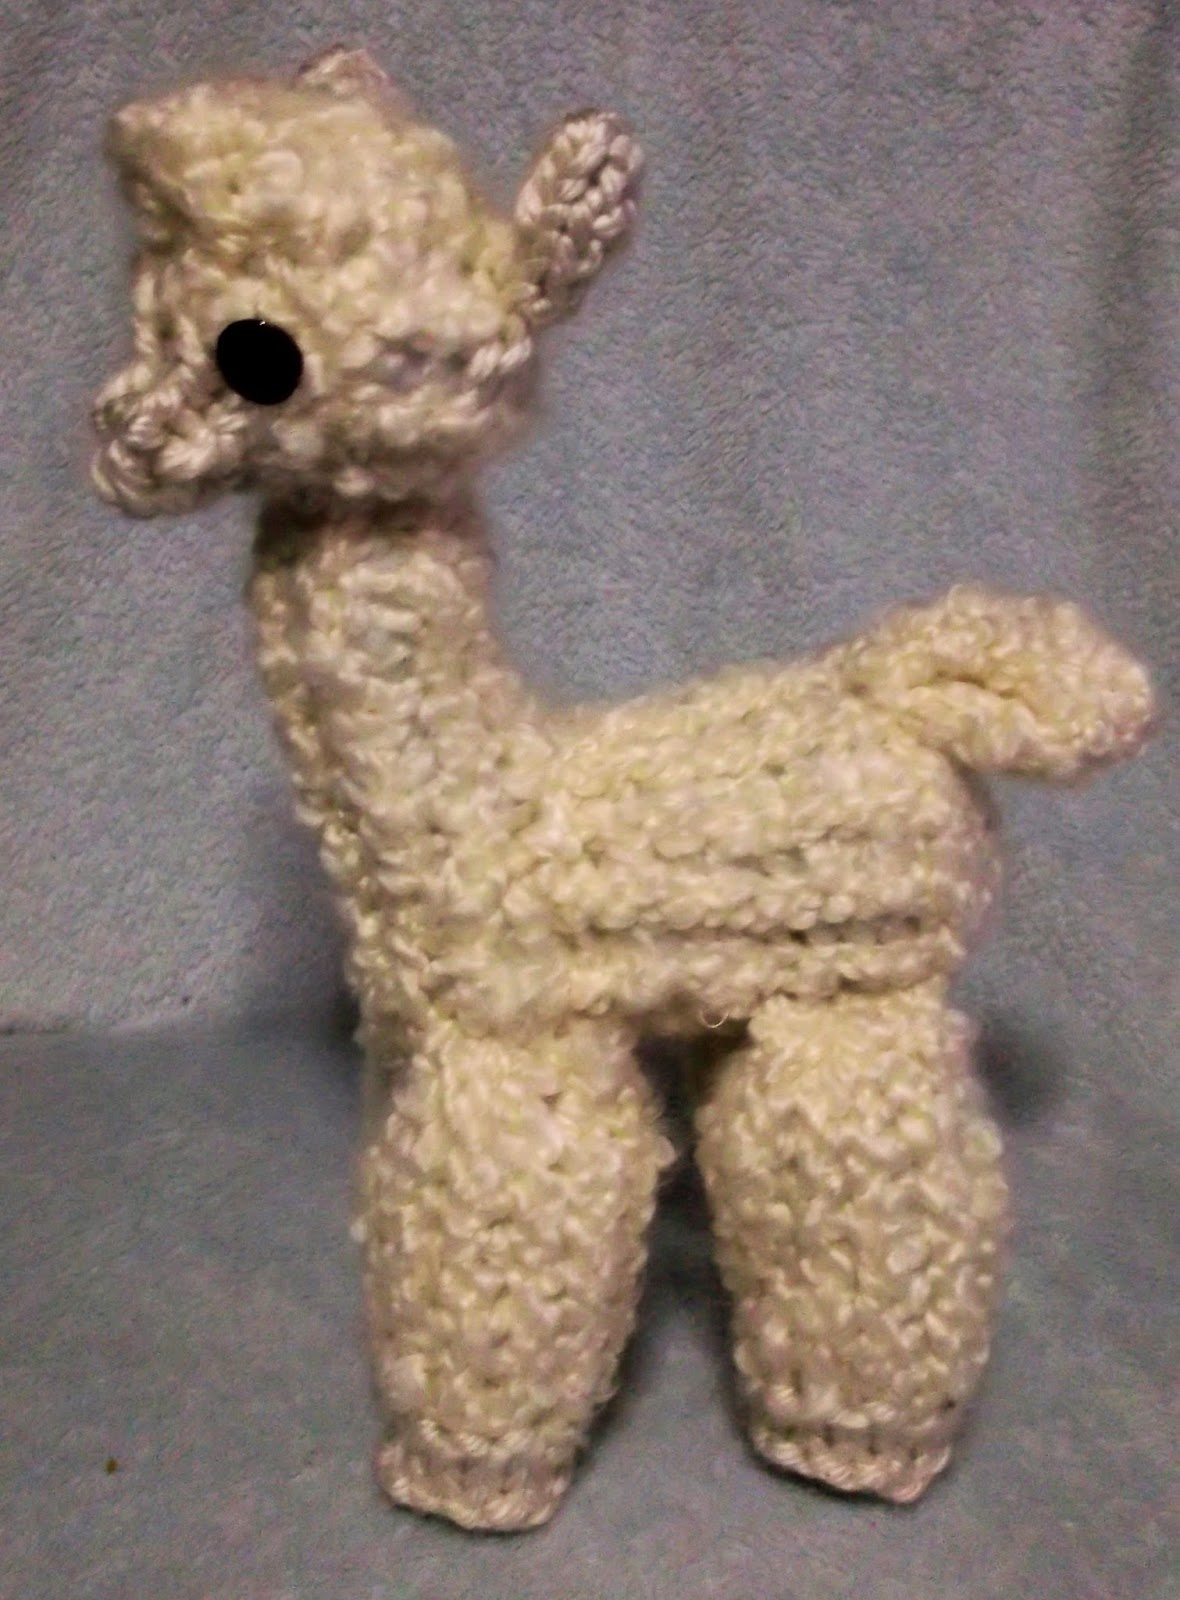
How to Loom Knit an Alpaca


Alpaca

Items:
12 peg loom
looming hook
crafters needle
crochet hook
1 skein of textured yarn super bulky (Try Bernat Tizzy Yarn) Best results.
1 skein of smooth yarn super bulky
polyfil
2 eyes

Terms:
DSCO: Draw String Cast On
EW: E-Wrap
P: Purl
K: Knit
I: Increase
ID: Internal Decrease
D: Decrease
WT: Wrap and Turn
BOLB: Bring Original Loop Back
CY: Change Yarn
T: Textured
S: Smooth
COF: Cast Off
DSCOF: Draw String Cast Off

Head: 12 pegs: Flat: Textured Yarn
DSCO 12
Row 1-5: EW
Row 6: EW3 (Ear: CY S K2, I1, K2, I1, K3, K4 3rows, K3, K2 3rows, K3, K4 3rows, D1 K1, D1 K1, BOLB, CY T EW2) EW2 (Repeat other ear) EW3
Row 7: EW
Row 8: EW8, WT, EW4, WT, EW3, WT, EW2, WT, EW2, EW3, EW4, EW5, EW9
Row 9: EW
Row 10: CC S EW
Row 11: ID from 12 to 6 pegs
Row 12-13: EW6
Row 14: EW2, K1 3times, K1 3times, EW2
Row 15: EW6
DSCOF
Sew up snout, close back of head, and stuff. If you didn't do the BOLB sew your ears up.Make sure to leave an opening at the bottom of the head to make sewing on the body easier.

Body: 12 pegs: Circular: Textured:
DSCO 12
Row 1-3: EW
Row 4: P
Row 5: EW5, (Tail: EW2, I1, EW2, I1, EW3, EW4 4rows, EW3, EW2 3rows, EW3, EW4 4rows, D1 EW1, D1 EW1, EW2 2rows BOLB) EW5
Row 6-13: EW
Row 14: EW6 (start working flat) EW9, WT, EW6, WT, EW5, WT, EW4, WT, EW3, WT, EW2, WT, EW2, EW3, EW4, EW5, EW6, EW7, EW9
Row 15: D1 EW1, D1 EW1, EW4, D1 EW1, D1 EW1 (8)
Row 16-24: EW
COF
Sew up neck, stuff, then close back end. Sew on head lining up back of head with tail. Sew up tail if you didn't do the BOLB.

Legs: 12 pegs: Circular: Smooth:
DSCO 12
Row 1-3: K
Row 4: P
Row 5-7: K
Row 8: CY T P
Row 9-17: EW (if you want thinner legs Knit and add 3 or 4 extra rows)
COF
Close up bottom of leg and stuff. Make 4. Find the base of the 2 columns that were not wrapped and turned at the base of the body. Start sew the leg at the base back, follow that line and sew the back leg on starting from the purled line on the back end. Repeat on both sides. If you have questions here check the video. Sew or glue your eyes on following the ears down to the base of the snout and sew your eyes on there. Your done!!!
(Note: if you want to do a darker alpaca I could suggest using 2 strands of textured yarn rather than one, reason being is with darker colors the filling will show through. )

Wednesday, February 11, 2015

Cabled Hooded Cowl


 One size fits all, this hat fits a man, woman, child, and even toddler. On the children it turns into a cape rather than a cowl.

Cabled Hooded Cowl

Items:
41 peg loom
looming hook
crafters needle
3skeins of super bulky yarn

Terms:
CO: Cast On
EW: E-Wrap
P: Purl
2LCC: 2 Peg Left Cable Cross
2RCC: 2 Peg Right Cable Cross
D: Decrease
I: Increase
WT: Wrap and Turn
BOLB: Bring Original Loops Back
DSCOF: Draw String Cast Off

Shoulder Panels: Flat: 41 Pegs:
EW CO 41 pegs
Row 1: EW
Row 2-5: P
Row 6: EW10, P1, EW2, P1, EW2, P1, EW3, P1, EW3, P1, EW2, P1, EW2, P1, EW10
Row 7: EW10: P1, EW2, P1, 2LCC, P1, 2LCC, EW1, P1, 2LCC, EW1, P1, 2RCC, P1, EW2, P1, EW10
Row 8: Repeat row 6
Row 9: EW10, P1, EW2, P1, EW2, P1, EW1, 2RCC, P1, EW1, 2RCC, P1, EW2, P1, EW2, P1, EW10
Row 10-13: Repeat rows 6-9
Row 14: Repeat row 6
Row 15: Repeat row 7
Row 16: D1 EW1, EW8, P1, EW2, P1, EW2, P1, EW3, P1, EW3, P1, EW2, P1, EW2, P1, EW8, D1 EW1 (39)
Row 17: EW9, P1, EW2, P1, EW2, P1, EW1, 2RCC, P1, EW1, 2RCC, P1, EW2, P1, EW2, P1, EW9
Row 18: D1 EW1, EW7, P1, EW2, P1, EW2, P1, EW3, P1, EW3, P1, EW2, P1, EW2, P1, EW7, D1 EW1 (37)
Row 19: EW8, P1, EW2, P1, 2LCC, P1, 2LCC, EW1, P1, 2LCC, EW1, P1, 2RCC, P1, EW2, P1, EW8
Row 20: D1 EW1, EW6, P1, EW2, P1, EW2, P1, EW3, P1, EW3, P1, EW2, P1, EW2, P1, EW6, D1 EW1 (35)
Row 21: EW7, P1, EW2, P1, EW2, P1, EW1, 2RCC, P1, EW1, 2RCC, P1, EW2, P1, EW2, P1, EW7
Row 22: D1 EW1, EW5, P1, EW2, P1, EW2, P1, EW3, P1, EW3, P1, EW2, P1, EW2, P1, EW5, D1 EW1 (33)
Row 23: EW6, P1, EW2, P1, 2LCC, P1,  2LCC, EW1, P1, 2LCC, EW1, P1, 2RCC, P1, EW2, P1, EW6
Row 24: D1 EW1, EW4, P1, EW2, P1, EW2, P1, EW3, P1, EW3, P1, EW2, P1, EW2, P1, EW4, D1 EW1 (31)
Row 25: EW5, P1, EW2, P1, EW2, P1, EW1, 2RCC, P1, EW1, 2RCC, P1, EW2, P1, EW2, P1, EW5
Row 26: D1 EW1, EW3, P1, EW2, P1, EW2, P1, EW3, P1, EW3, P1, EW2, P1, EW2, P1, EW3, D1 EW1 (29)
Row 27: D1 EW1, EW2, P1, EW2, P1, 2LCC, P1, 2LCC, EW1, P1, 2LCC, EW1, P1, 2RCC, P1, EW2, P1 D1 EW1 (27)
Row 28: D1 EW1, EW1, P1, EW2, P1, EW2, P1, EW3, P1, EW3, P1, EW2, P1, EW2, P1, D1 EW1 (25)
Row 29: D1 EW1, P1, EW2, P1, EW2, P1, EW1, 2RCC, P1, EW1, 2RCC, P1, EW2, P1, EW2, P1, D1 EW1 (23)
Row 30: D1 P1, EW2, P1, EW2, P1, EW3, P1, EW3, P1, EW2, P1, EW2, D1 P1 (21)
Row 31: P1, EW2, P1, 2LCC, P1, 2LCC, EW1, P1, 2LCC, EW1, P1, 2RCC, P1, EW2, P1
Repeat rows 1-31 to create another half. Put your first half on a stitch holder. Once done place the other half back on the loom. At this point you will want to start working circularly.
Starting the neck area, we will be starting to work circular. What you will need to do is re-attach your loops from your first panel you made. Make sure the positive side is facing you when you put your loops back on the loom. Starting from right to left, place your first loop on your stitch holder over the last loop on the panel on the loom. Then place the rest of the loops on the loom. Mark your cable zones if you so wish.
Neck area: Circular: 41 pegs:
Row 32: P1, EW2, P1, EW2, P1, EW3, P1, EW3, P1, EW2, P1, EW2, P2, EW2, P1, EW2, P1, EW3, P1, EW3, P1, EW2, P1, EW2
Row 33: P1, EW2, P1, 2LCC, P1, EW1, 2RCC, P1, EW1, 2RCC, P1, 2RCC, P1, EW2, P2, EW2, P1, 2LCC, P1, EW1, 2RCC, P1, EW1, 2RCC, P1, 2RCC, P1, EW2
Row 34: P1, EW2, P1, EW2, P1, EW3,P1, EW3, P1, EW2, P1, EW2, P2, EW2, P1, EW2, P1, EW3, P1, EW3, P1, EW2, P1, EW2
Row 35: P1, EW2, P1, EW2, P1, 2LCC, EW1, P1, 2LCC, EW1, P1, EW2, P1, EW2, P2, EW2, P1, EW2, P1, 2LCC, EW1, P1, 2LCC, EW1, P1, EW2, P1, EW2
Row36-48: Repeat rows 32-35 3times
We have completed the neck and are fixing to start working flat to open the face area up.
Row 49: EW2, P7, D1 P1, P6, EW2, P2, EW2, P1, EW2, P1, EW3, P1, EW3, P1, EW2, P1, EW2, P1, (this row is extended to start working flat) EW2, P1, EW6 (40)
Start working Flat
Row 50: P7, EW2, P1, EW2, P1, 2LCC, P1, EW1, 2RCC, P1, EW1, 2RCC, P1, 2RCC, P1, EW2, P2, EW2, P1, EW6
Row 51: P7, EW2, P2, EW2, P1, EW2, P1, EW3, P1, EW3, P1, EW2, P1, EW2, P1, EW2, P1, EW6
Row 52: P7, EW2, P1, EW2, P1, EW2, P1, 2LCC, EW1, P1, 2LCC, EW1, P1, EW2, P1, EW2, P2, EW2, P1, EW6
Row 53: P7, EW2, P2, EW2, P1, EW2, P1, EW3, P1, EW3, P1, EW2, P1, EW2, P1, EW2, P1, EW6
Row 54-78: Repeat rows 50-53 6times
Now we are going to make a bill or visor which we will be then reconnecting our ends to eventually start working circular again.
Row 79: I1 adding back in that empty loop, EW6, WT, P13, WT, EW12, WT, P11, WT, EW10, WT, P9, WT, EW8, WT, P7, WT, EW6, WT, P5, WT, EW4, WT, EW4 
EW2 P1 EW2,
EW2 P1 EW3,
EW3 P1 EW3,
EW1 2RCC P1 EW1 2RCC P1,
P1 EW3 P1 EW3 P1,
P1 2LCC EW1 P1 2LCC EW1 P1 EW1,
EW1 P1 EW3 P1 EW3 P1 EW1,
EW1 P1 EW1 2RCC P1 EW1 2RCC P1 EW2,
EW2 P1 EW3 P1 EW3 P1 EW2,
EW2 P1 2LCC EW1 P1 2LCC EW1 P1 EW2 P1
P1 EW2 P1 EW3 P1 EW3 P1 EW2 P1
P1 2LCC P1 EW1 2RCC P1 EW1 2RCC P1 2RCC P1
BOLB toss bottom loops over the top. Bill or visor complete.
Row 80: (New Starting Point) EW2, P1, EW2, P1, 2LCC, P1, EW1, 2RCC, P1, EW1, 2RCC, P1, 2RCC, P1, EW2, P2, EW2, P1, EW2, P1, EW3, P1, EW3, P1, EW2, P1
Row 81: EW2, P1, EW2, P1, EW2, P1, EW3, P1, EW3, P1, EW2, P1, EW2, P2, EW2, P1, EW2, P1, 2LCC, EW1, P1, 2LCC, EW1, P1, EW2, P1,
Row 82: EW2, P1, EW2, P1, EW2, P1, 2LCC, EW1, P1, 2LCC, EW1, P1, EW2, P1, EW2, P2, EW2, P1, EW2, P1, EW3, P1, EW3, P1, EW2, P1
Row 83: EW2, P1, EW2, P1, EW2, P1, EW3, P1, EW3, P1, EW2, P1, EW2, P2, EW2, P1, 2LCC, P1, EW1, 2RCC, P1, EW1, 2RCC, P1, 2RCC, P1,  
Row 84-92: Repeat rows 80-82 2times
Decrease by every other peg toss bottom loops over top and DSCOF
Sew up sides of the shoulders and your done!!!!

Monday, February 9, 2015

How to Loom Knit a Pig


Small Pig

Items:
12 peg loom
looming hook
crafters needle
size f crochet hook
2 strands of worsted yarn (can use a scrap yarn)
polyfil
black puff paint

Terms:
DSCO: Draw String Cast On
K: Knit
P: Purl
ID: Internal Decrease
BOLB: Bring Original Loops Back
DSCOF: Draw String Cast Off

Working from bottom to nose: Circular: 12 pegs:
DSCO 12 pegs
Row 1-3: K
Row 4: P
Row 5: K3, Leg1 K3 15rows, Leg2 K3 15rows, K3
Row 6-14: K
Row 15: Repeat row 5
Row 16-19: K
Row 20: (Ear1 K3 4rows, K2 1row, K1 1row, K2 1row, K3 4rows, BOLB) K6, (repeat other ear)
Row 21: K6, start working flat going back the direction you came.
Row 22-24: K
Row 25: ID 12 to 6 pegs
Row 26-28: K6
Row 29: P
Row 30-31: K
DSCOF
Sew up snout and legs. Stuff. Close off back of bottom. Take some scrap yarn and a size f crochet hook and chain 8, then slip stitch back. sew in tail. Use puff black fabric paint to make eyes. Let dry and your done.

Monday, February 2, 2015

How to Loom Knit a Horse


Horse

Items:
24 and 12 peg loom
looming hook
crafters needle
crochet hook
polyfil
super bulky to bulky yarn 2 skeins
2 eyes

Terms:
CO: Cast On
DSCO: Draw String Cast On
K: Knit
P: Purl
WT: Wrap and Turn
D: Decrease
BOLB: Bring Original Loop Back
COF: Cast Off
CC: Change Color
B: Brown
BL: Black

Head: 24 pegs: Flat
DSCO 24 peg
Row 1-2: K
Row 3: K23, WT, K22, WT, K21, WT, K20, WT, K19, WT, K18, WT, K17, WT, K16, WT, K15, WT, K14, WT, K13, WT, K12, WT, K11, WT, K10, WT, K10, K1(Ear: K4 7rows, K2 4rows, K4 6rows, BOLB) (ear: K4 6rows, K2 4rows, K4 7rows, BOLB), K2, K12, K13, K14, K15, K16, K17, K18, K19, K20, K21, K22, K23,K24
Row 4-6: K
Row 7: D1 K1, D1 K1, D1 K1, D1 K1, D1 K1, K4, D1 K1, D1 K1, D1 K1, D1 K1, D1 K1 (14)
Row 8-11: K
Row 12: K4 (Nostril: K2 5rows) K2, repeat nostril, K4
Row 13-14: K
COF
Sew up nose and snout of the head and stuff.

Body: 24 pegs: Circular:
DSCO 24 circular
Row 1-5: K
Row 6: P
Row 7-16: K
Row 17: K10, D1 K1 (Start working flat)
Row 18: K21, D1 K1 (22)
Row 19: K16, WT, K10, WT, K9, WT, K8, WT, K7, WT, K6, WT, K6, K7, K8, K9, K10, K11, K17
Row 20: D1 K1, K18, D1 K1 (20)
Row 21: K15, WT, K10, WT, K9, WT, K8, WT, K7, WT, K6, WT, K6, K7, K8, K9, K10, K11, K16
Row 22: D1 K1, K16, D1 K1 (18)
Row 23: K
Row 24: D1 K1, K14, D1 K1 (16)
Row 25: K
Row 26: D1 K1, K12, D1 K1 (14)
Row 27-28: K
COF
Sew up neck, close bottom, stuff. Sew on Head.

Front Legs: 12 Pegs: Circular:
DSCO 12 pegs
Row 1-2: K
Row 3: P
Row 4-17: K
COF
Make 2, close up bottom, and stuff.

Back legs: 12 pegs: Circular:
DSCO 12 pegs
Row 1-2: K
Row 3: P
Row 4-7: K
Row 8: K6, WT, K5, WT, K4, WT, K3, WT, K2, WT, K2, K3, K4, K5, K12
Row 9-17: K
COF
 Make 2, close up bottom, and stuff.

Sew the head on first lining the back of the head up with the back of the body. Also follow the 6 columns on the body that exsist between the wrap and turns. Follow the base and sew the front legs on from that point follow the line to the back sew from the purled line. Glue or sew the eyes in the middle lined up from the outer ears and the decreased section. Also weave in your mane lined up with the center with the connecting yarn between the columns. Find the center back purled lines, weave in tail on the 3 center purled line. After that your done!!!!

Friday, January 23, 2015

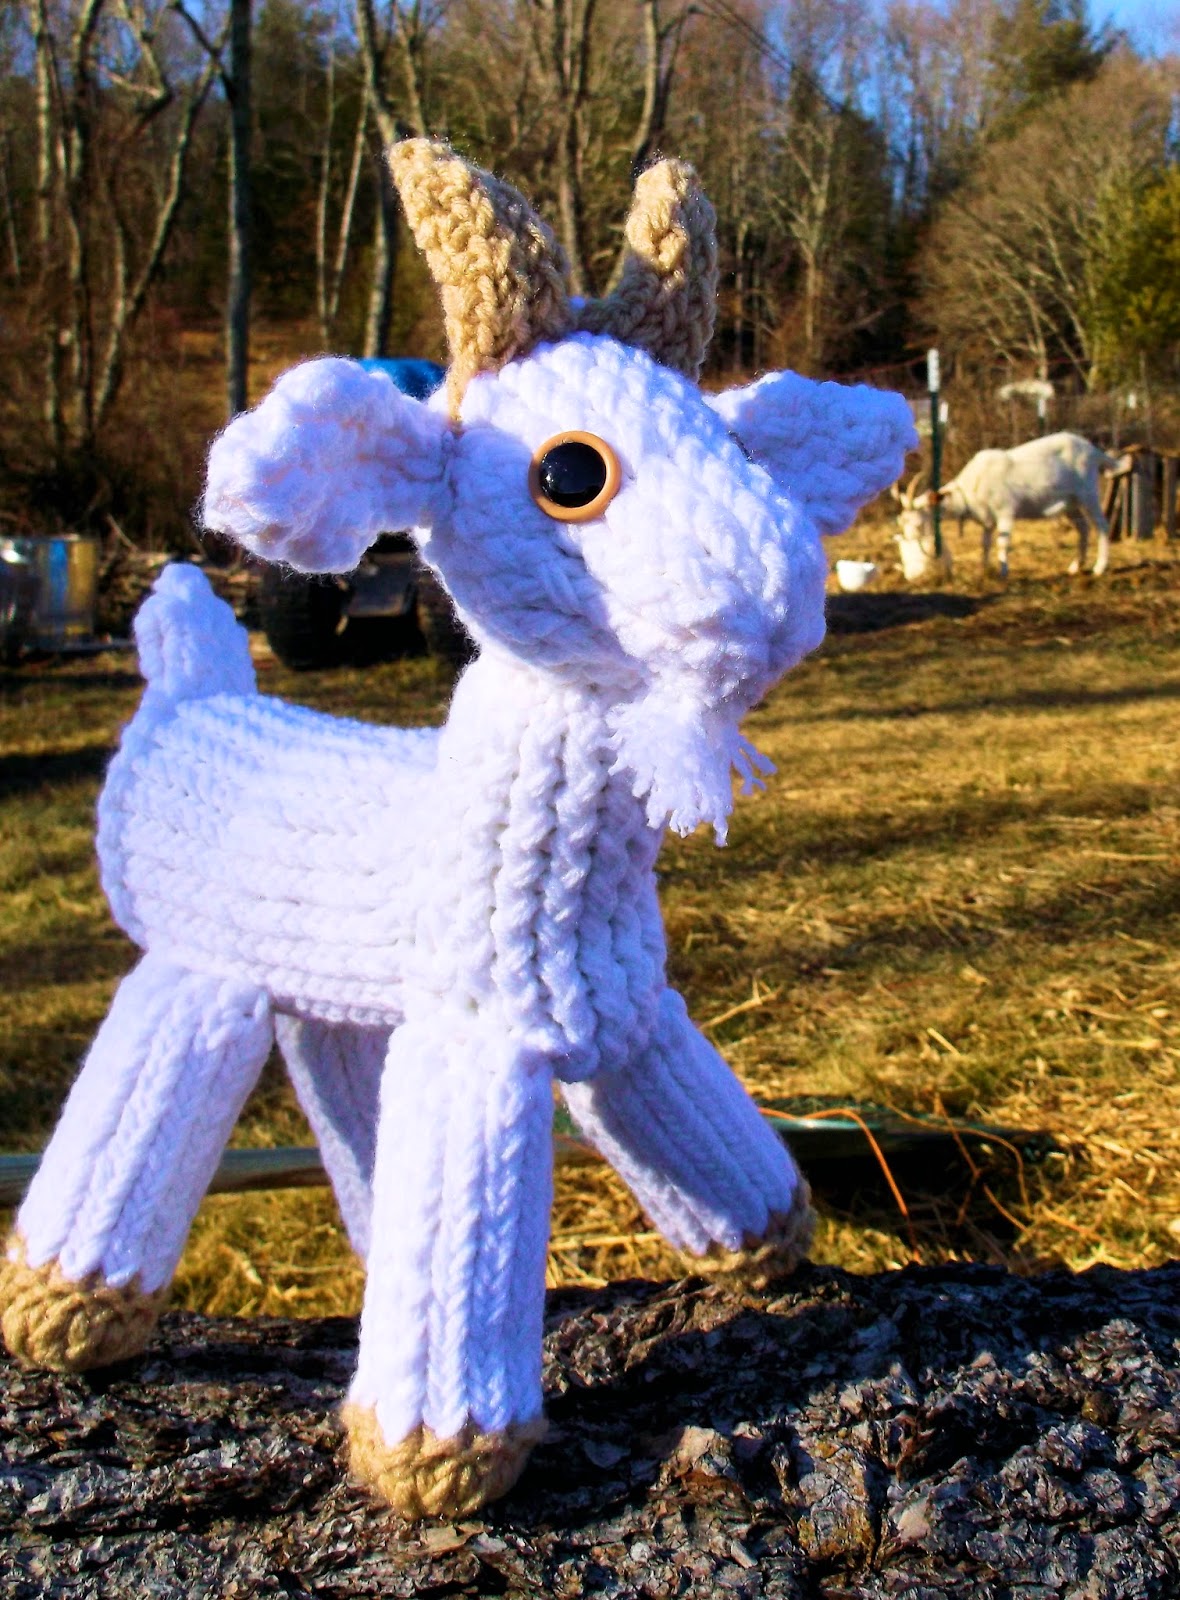
How to Loom Knit a Goat


 This pattern is shown for a Sanaan which is good for other larger goat breeds, you will simply need to adjust the colors as necessary for the preference you are looking for. I have also included instructions for creating the smaller breeds, as well as how to go about removing horns and adding jewels. If you are looking for ears for the nubian or boer breeds give me time to work the ear pattern up. If you have my dog pattern I would suggest trying the dog ears where the ears are on the goat for a nubian or boer.


Goat

Items:
24 peg and 12 peg loom
looming hook
crafters needle
crochet hook
2 skeins of yarn (White )
scrap yarn of Tan yarn
polyfil
2 eyes

Terms:
DSCO: Draw String Cast On
EW: E-Wrap
P: Purl
D: Decrease
I: Increase
WT: Wrap and Turn
DSCOF: Draw String Cast Off
COF: Cast Off
CC: Change Color
W: White
T: Tan
BOLB: Bring Original Loop Back

Head: Flat: 24 pegs:
DSCO 24 pegs
Row 1-6: EW
Row 7: EW4 (Ear: EW4 2rows, I1 EW4, I1 EW5, EW6 4rows, EW4 3rows, EW2 3rows,(Change color to pink at the point if you want) EW4 3rows, EW6 4rows, D1 EW1 EW2 D1 EW1, EW4 4rows, BOLB)If you want to do a hornless goat EW8(Horn: CC T, EW4 8rows, EW3, EW2 3rows, EW3, EW4 10rows BOLB) repeat horn, CC W repeat ear, EW4 (Note: on the increased pegs make sure not to touch the original loop on the peg, you end up connecting the middle of your head with the middle of your ear if you do. Also when you bring your original loops back toss the bottom loops over. Plus you don't have to cut your white when you change to doing the horn color.)
Row 8-13: EW
Row 14: D1 EW1, D1 EW1, D1 EW1, D1 EW1, D1 EW1, EW4, D1 EW1, D1 EW1, D1 EW1, D1 EW1, D1 EW1 (bring the loops together and tighten your loops)
Row 15-21: EW
DSCOF
Sew up snout, ears, and horns. Close up the back of the head and stuff.

Body: Circular: 24 pegs:
DSCO 24 White
Row 1-5: EW
Row 6: P10 (Tail: EW4 4rows, EW3, EW2 3rows, EW3, EW4 4rows, BOLB) P10
Row 7-22: EW (if wanting to do a smaller sized goat do 10rows rather than 15rows)
Row 23: EW10, D1 EW1, (Start working Flat) EW21, D1 EW1
Row 24: EW16, WT, EW10, WT, EW9, WT, EW8, WT, EW7, WT, EW6, WT, EW5, WT, EW4, WT EW4, EW5, EW6, EW7, EW8, EW9, EW10, EW11, EW12, EW17
Row 25: D1 EW1, D1 EW1, D1 EW1, EW10, D1 EW1, D1 EW1, D1 EW1 (16)
Row 26-32: EW16 (if you want a short neck do 5 rows rather than 7 rows) If you want to add jewels on the first row of this section EW6, EW2 6rows BOLB, EW2 6rows BOLB, EW6.
COF
Sew up the neck and close up the bottom and stuff.

Legs: Circular: 12 pegs:
DSCO 12 pegs Tan
Row 1-2: EW
Row 3: P
Row 4-13: CC W EW (If you want shorter legs do 7 row rather than 10rows)
COF
Make 4, close up bottoms, and stuff.

Assemble:
Sew head on first lining back of head up with the tail. When sewing on legs start off with the front legs, find the base of the 4 column that was left after the wrap and turn sew the legs on at the base. Lining up your back legs on the same line as the front but start sewing from the purled row forward. Hot glue or sew on your eyes lined up between the horn and ears at the base of the snout. Weave in and trim up your beard area under the chin. Your done!!!
Give me time to work up Nubian and Boer ears to add later.

Thursday, January 15, 2015

How to Loom Knit a Lace/ Stained Glass Hat


Lace Hat

Supplies:
41 peg loom
looming hook
worsted yarn using 2 strands
crafters needle

Terms:
CO: Cast On
EW: E-Wrap
EW->: E-Wrap and move forward to the next peg
EW/EW: E-Wrap 2 together
P: Purl
YO: Yarn Over
D: Decrease
DSCOF: Draw String Cast Offf


EW CO 41
Row 1: EW
Row 2: EW1, EW->, EW/EW, EW2 Repeat 7 more times
Row 3: EW1, YO1,  EW3 Repeat 7 more times
Row 4: EW->, EW/EW, EW->, EW/EW, EW1 Repeat 7 more times
Row 5: YO, EW, YO, EW2 repeat 7 more times.
Row 6: Repeat row 2
Row 7: Repeat row 3
Row 8: EW
Row 9: P
Row 10: EW
Row 11: P1, EW3, take loops 5 and 7 and place them on peg 6, YO, EW, YO, EW3, P3 repeat this 2 more times.  P2
Row 12: P1, EW3, P1, EW1, P1, EW3, P3 Repeat 2 more times P2
Row 13: P1, EW2, move loop 4 to peg 5, YO, EW2, move loop 8 to peg 7, EW1, YO, EW2, P3 repeat 2 more times P2
Row 14: P1, EW2, P1, EW3, P1, EW2, P3 repeat 2 more times P2
Row 15: P1, EW1, move loop 3 to peg 4, YO, EW4, move loop 9 to peg 8, EW1, YO, EW1, P3 repeat 2 more times P2
Row 16: P1, EW1, P1, EW5, P1, EW1, P3 repeat 2 more times P2
Row 17: P1, EW2, move loop 4 to peg 5, YO, EW2, move loop 8 to peg 7, EW1, YO, EW2, P3  Repeat 2 more times P2
Row 18: P1, EW2, P1, EW3, P1, EW2, P3  repeat 2 more times P2
Row 19: P1, *EW3, move loop 5 and 7 to peg 6, YO, EW, YO,  EW3, move loop 12 to peg 11, move loop 13 to peg 14*. Repeat 2 more times from EW3. P1
Row 20: P1, EW3, P1, EW1, P1, EW3, P2, EW1,  repeat 2 more times from P1
Row 21: Move loop 2 to peg 1 , move loop 3 to peg 4, EW9, move loop 11 to peg 10, move loop 12 to peg 13, EW4, repeat 2 more times, P2
Row 22: P2, EW1, P1, EW5, P2, EW1, P1, Repeat 2 more times, move loop 41 to peg 40 EW2
Row 23: Move loop 1 to peg 2, EW2, move loop 4 to peg 3, and loop 5 to peg 6, EW4, move loop 8 to peg 7 and loop 9 to peg 10, EW4, move loop 12 to peg11 and loop 13 to peg 14, EW4, move loop 16 to peg 15 and loop 17 to peg 18, EW4, move loop 20 to peg 19 and loop 21 to peg 22, EW4, move loop 24 to peg 23 and loop 25 to peg 26, EW4, move loop 28 to peg 27 and loop 29 to peg 30, EW4, move loop 32 to peg 31 and loop 33 to peg 34, EW4, move loop 36 to peg 35 and loop 37 to peg 38, EW4, P3
Row 24: EW1, P1, *P2, EW1, P1* Repeat from star 8 more times, P3
Row 25: Move loop 2 to peg 1 and loop 3 to peg 4, EW4 repeat 9 more times, P1
Row 26: P2, EW1, P1, repeat 9 more times, P1
Row 27: D by everyother peg and toss bottom loop over.
DSCOF

Base Hat

EW CO 41 pegs
Row 1-12: EW
Fold to make a brim
Solid color Row 13-32: EW
If multicolor change colors every 5 rows until you complete a total of 32 rows.
DSCOF

Sew lace hat on top of the base hat to create a stained glass hat. 

Thursday, December 18, 2014

Owl Collection Patterns

 Realistic Owl Hat Pattern

When you purchase this pattern for $2 you get the PDF of the written pattern plus 2 YouTube video links to assist in creating this unique pattern.


Realistic Owl Hat Pattern


The Owl
When you purchase this pattern you receive a PDF of the written pattern along with the link to the YouTube video tutorial.


Sale!!!!
When you go to my website you get both these patterns in a bundle for $3 that means you get 1 for free!!! Click here to go to my website and get your patterns. They will be on sale until mid January.