Saturday, June 29, 2019

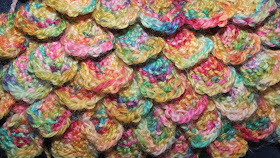
How to Loom Knit the New Crocodile Stitch


How to Loom Knit the New Crocodile Stitch

by 

Scarlett Royale

Inspired by Christie Davis


You might be asking how is this new.... well it is new because this isn't my first time playing with crocodile stitch on the looms. I came up with a method several years ago that worked beautifully, but to be quite honest used up a lot of yarn and was quite bulky. 


This new method is delicate, uses less yarn, and lacks the bulk that my original way had. The wonderful news is that Christie Davis inspired the new method with her "Drifting Pedals Trim" 
(Please check it out, beautiful trim!!!) She also shows how to do a pedal from a right handed method. 

There are some unique things to keep in mind with this new crocodile stitch. My original the scale showed up on the positive side of the fabric when being worked. This version does not, it shows on the opposite side and is inside the loom when working. That means if you are adding as an accent you will need to do the opposite of what you normally do when doing knits and purls to achieve a stitch pattern you are after. 

With that said lets gets to writing this out in detail.  


Terms: 
E-Wrap Cast On: EWCO
K: Knit
P: Purl
Knit 2 Stitches Together: K2tog
E-Wrap: EW
Slip: SL
Purl Pull Loop: PPL: meaning you are going to create a loop and then pull through the bottom of each loop for the pedal to prep to gather the stitches. 

Pedal Break Down
EWCO 6
Row 1-6: K1, P1, K1, P1, K1, P1

Row 7: EW6, K1
Row 8: PPL place loop made onto peg 1 of the 6 peg cast on pegs. K previous peg, then K2tog


Worked Flat
EWCO (looms in counts of 5's)
In the video I used a 24 peg loom which worked well too. 
Row 1: P
Row 2: K
Row 3: P
Row 4: SL1 *(pedal: EWCO6, K1 P1 3x for 6 rows, EW6, K1, PPL place loop made onto peg 1 of the 6 peg cast on pegs. K previous peg, then K2tog), K3 ** Keep in mind when doing the pedal do not touch the stitches that already exist on the peg. The pedal is being worked above those stitches. Also repeat from *-** until desired length. 
Row 5: SL1, P
Row 6: SL1, K
Row 7: SL1, P
Row 8: SL1, K
Row 9: SL1, P
Row 10: SL1, K2,*(pedal: EWCO6, K1 P1 3x for 6 rows, EW6, K1, PPL place loop made onto peg 1 of the 6 peg cast on pegs. K previous peg, then K2tog), K3 ** Keep in mind when doing the pedal do not touch the stitches that already exist on the peg. The pedal is being worked above those stitches. Also repeat from *-** until desired length. 
Row 11: SL1, P
Row 12: SL1, K
Row 13: SL1, P
Row 14: SL1, K
Row 15: SL1, P
Repeat rows 1 through 12 over and over to desired length.  

Worked In the Round

EWCO (looms in counts of 5's)
In the video I used a 24 peg loom which worked well too. 
Row 1: P
Row 2: K
Row 3: P
Row 4: K1 *(pedal: EWCO6, K1 P1 3x for 6 rows, EW6, K1, PPL place loop made onto peg 1 of the 6 peg cast on pegs. K previous peg, then K2tog), K3 ** Keep in mind when doing the pedal do not touch the stitches that already exist on the peg. The pedal is being worked above those stitches. Also repeat from *-** until desired length. 
Row 5: P
Row 6: K
Row 7: P
Row 8: K
Row 9: P
Row 10: K3,*(pedal: EWCO6, K1 P1 3x for 6 rows, EW6, K1, PPL place loop made onto peg 1 of the 6 peg cast on pegs. K previous peg, then K2tog), K3 ** Keep in mind when doing the pedal do not touch the stitches that already exist on the peg. The pedal is being worked above those stitches. Also repeat from *-** until desired length. 
Row 11: P
Row 12: K
Row 13: P
Row 14: K
Row 15: P
Repeat rows 1 through 12 over and over to desired length. 

Check out the new fan cast on based off of this technique!!!


Saturday, June 22, 2019

Gauge Matters, a Nice Trick to Opening Up Patterns for Different Looms

Gauge Matters 

A Nice Trick to Open Up a Ray of Patterns for Different Looms

Now I could have sworn I posted about this in a video or blog but can't find it anywhere. So here it is. Please feel free to share this simple trick. 

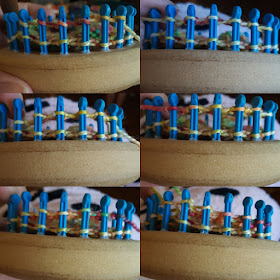
Did you know you can take a 24 peg loom in the 3/4" gauge that makes an adult large booties and animals and then go to the 24 peg 3/8" gauge and make it for a baby size then. Look at these examples below of just the change in gauge. 


You can do it with all looms, lets say someone put out a 60 peg in the 3/8" gauge and you find tons of patterns in the 1/2" gauge, you can use those patterns to create baby sizing with those patterns.


Never again feel stifled by gauge, if you know there are patterns out there, and you want them smaller simply do this trick. If they start out in e-wrap and you want it really small find smallest gauge and flat knit.  Also keep in mind if you are going from a small pattern to a larger for a bootie you may need to do just a few more rows. 


Thursday, June 20, 2019

X Loom Cheat Sheet for Wedge Set Up

X Loom Cheat Sheet Wedge Set Ups
For hats and socks or slippers

5/8" Gauge

24 pegs: 6,6,6,6

30 pegs: 8,8,8,6
32 pegs: 8,8,8,8

42 pegs: 10,10,10,12

44 pegs: 10,12,10,12

48 pegs: 12,12,12,12

52 pegs: 14,12,14,12

54 pegs: 14,14,14,12
1/2" Gauge
24 pegs:6,6,6,6
30 pegs: 8,8,8,6
36 pegs: 10,10,8,8
40 pegs: 10,10,10,10
44 pegs: 12,10,12,10

50 pegs: 14,12,12,12

56 pegs: 14,14,14,14
60 pegs: 16,14,16,14

66 pegs: 18,16,16,16

3/8" Gauge
24 pegs:6,6,6,6

28 pegs:8,6,8,6
30 pegs:8,8,8,6
36 pegs:10,8,10,8

40 pegs: 10,10,10,10

44 pegs: 12,10,12,10

48 pegs: 12,12,12,12
54 pegs: 14,14,14,12

56 pegs: 14,14,14,14
60 pegs: 16,14,16,14
68 pegs: 18,16,18,16
72 pegs: 18,18,18,18
80 pegs: 20,20,20,20

88 pegs: 22,22,22,22
90 pegs: 24,22,22,22 


Sunday, June 2, 2019

The Great Loom Knitting Gift Project


The Great Loom Knitting Gift Project 

Please feel free to send Renee Van Hoy a message on Ravelry telling her all the great work she did getting different designers together and putting this wonderful book together!!! 


These sweet teddy bears are designed for the little one in your life. Made on any gauge loom with 24 pegs, the pattern uses short rows to shape the arms, legs, tail, head and ears of the little bears without a single seam. All steps are fully written and described, however photos are included for reference as well. The e-book of patterns is available for pre-order June 1, 2019 and will be published July 1, 2019. Promotional 10% coupon from CinDwood Looms is included with pre-order as well as automatic entry for Loom prize drawing.
Loom: A 24 peg round loom of any gauge; photo samples made on 5/8 inch medium gauge and 3/8 inch fine gauge looms
Size and Gauge: size and gauge will depend on loom chosen and are not defined by the pattern
Yarn: 70 – 100 yards with weight adjusted to loom gauge being used; small bear made on 3/8 inch fine gauge loom from Bernat Baby, a DK weight yarn; large bear made on 5/8 inch gauge loom from Lion Brand Go for Faux, a super bulky fur yarn
Notions: loom tool, yarn needle, removable stitch markers, polyfil stuffing, safety eyes and safety nose
All proceeds from the The Great Loom Knitting Gift Project e-book will be donated to Doctors without Borders.
All digital sales are final. No refunds will be given.
The e-book includes two files, a 228 page large print book and a 124 page paper saver book.
Seamlessly Cute Bears is one of 21 patterns in the collaborative designer fundraising e-book The Great Loom Knitting Gift Project. The book incorporates these guidelines for low vision and screen reader accessibility:
24 point large print sans serif font
Single columns
Breaks between paragraphs
Descriptive photo captions
Minimized abbreviation
No patterns that rely on charts alone
Enlarged graphics and photos
No footnotes
No italics