Knit peg 2, place peg 2 stitch on peg 1 and toss the bottom loop over. Move stitch to the empty peg. Repeat over and over.
I am using a 66 peg loom for this project but you can use a 40 or 48 peg as well but the sizing will end up in reverse. Gauging is not a worry as your yarn is your gauge.
Cast On 66 Flat
Knit flat for 3 skeins
Bind Off
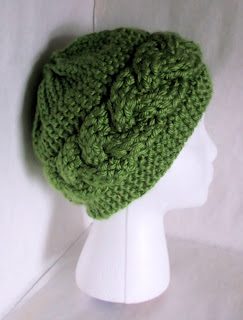
Add a border of your choice if you would like. I chose to crochet a fan border.
Review
Cost: $12 to $8 a skein
Availability: Most craft stores
Yardage: approximately 18 to 16 yards
Material: 100% Polyester
Overall: It is very soft and easy to work with with. Expensive to make a project with since you would need several to do just a twin size blanket. Don't plan on any stitch patterns as I tried a purl you couldn't tell it at all. So it is just a stockinette. Your border is where you can get fancy. Will give you approximate number of skeins for blanket sizes.
If you are using a 40 peg loom.
Crib Blanket: 1 panel, 3 skeins.
Twin: 2 panels, 5 skeins.
Full: 3 panels, 8 skeins.
Queen: 4 Panels, 13 skeins.
You can make a pillow likely with just one skein. You might could make a poncho using the twin blanket method but leave a hole open in the middle when sewing up.
Many times we like the look of a simple sweater, but would like a different size then the one that was made. Well this post will help you figure out how you can change the size to suit your needs for the gauge, yarn, and loom you have. Don't fear the formula simply plug in your numbers and use a calculator to get your rows and stitches you will need.
First you will need a swatch.
Knit a panel 20 stitches by 20 rows.
Measure your number of stitches per inch
and your number of rows per inch.
Measurements
Chest Circumference
Wait Circumference
Hip Circumference
Length (Pit to Hip)
Arm Length (Pit to Wrist) AL
Arm Circumference (Near Shoulder) AW
Head Circumference HC
Neck Length NL
Enlarge all measurements by 3" for nice fit, 6" for loose fit.
Formula
Body:
Chest x SPI = #pegs
Length x RPI = #BR
AW / 2 = #C
#C x RPI= #CR
Arms:
AL x RPI= #AR
AW x SPI= #Apegs
Neck:
HC x SPI= #NP
NL x RPI= #NR
Yoke:
#pegs + #Apegs + #Apegs= #TS
#TS - #NP = #TD
#TD/4=#DPS
#DPS/2=#DPR
#CR/#DPR=#RPS
What all does this means above?
#pegs is the total number of pegs you will need for the body. You may need to divide this in half to do a front half of the sweater and a back half of the sweater.
#BR is the total number of rows for the body.
#C is the measurement from the chest to neck.
#CR is the total number of rows for the chest area.
#AR is the total rows for the sleeve length.
#Apegs is the total number of pegs you will need for the sleeve.
#NP is the total number of pegs you will need for the turtle-neck area.
#NR is the total number of rows needed for the neck area, if you want it to fold down double this number.
#TS is the total number of stitches you will have from front, back, and sleeves.
#TD is the total number of decreases.
#DPS is the total number of decreases per section.
#DPR is the number of rows with 2 decreases.
#RPS is the number of rows per set.
Example of adult size sweater in a solid color.
Swatch in 1/2" gauge with bulky yarn
4 SPI
6 RPI
Measurements
Women's size 16 to 18 sweater US sizing.
HC 21.75
Chest 48"-50"
Waist 40"-42"
Hips 50.5"- 52"
AL 19.5"-21"
AW 16.5"-18"
Length 22"-24"
NL 3.5"
Formula
Since the hips are larger than the chest we will use that measurement. Always use the largest between chest, waist, and hips.
Body
52 x 4= 208 pegs (104 pegs for front, and 104 for back.) #pegs
24 x 6= 144 rows #BR
18/2= 9" #C
9 x 6= 54 rows #CR
Arms
21 x 6= 126 rows #AR
18 x 4= 72 pegs #Apegs
Turtle-neck
3.5 x 6= 21 (42 rows if you want to fold it down) #NR
21.75 x 4= 87 pegs for the neck #NP
Yoke
208 + 72 + 72= 352 #TS
352-87= 265 #TD
265/4= 66.25 round down to 66 #DPS
66/2= 33 #DPR
54/33= 1.63 round up to 2 #RPS
What all these numbers mean?
You will use 104 pegs for the front of the sweater and for the back in 2 parts.
You will do 144 rows total for the length of the front and back of the sweater.
You will have 9" you will be working with on the chest to neck area.
Which means you will dedicate 54 rows for the yoke area of the front, back, and sleeve area of the sweater when decreasing.
You will do 126 rows for your sleeves.
You will need 72 pegs for your sleeves.
You will do 21 rows for the turtle-neck area or if you want it to fold down 42 rows.
You will use 87 pegs for the turtle-neck area.
You will have a total of 352 stitches between your sleeves and body.
You will have a total of 265 decreases to get down to the number of pegs for your neck.
You will have 66 decreases to do for each section sleeve, body front, body back, and sleeve.
You will have 33 rows with 2 decreases in each row for each part of the sweater.
You will do 2 row sets. This is one row knit, and one row with 2 decreases at the ends.
Lets take a look at this written out.
Body Front
Keep in mind when doing the yoke area that you will not have a perfect due to the decimal of not being exactly 2 rows, so when you start to get towards the end you will need to sometimes do more decrease rows to get all your decreases in your number of yoke rows.
Terms
EW CO: E-Wrap Cast On
K: Knit
K2tog: Knit 2 Stitches Together
P: Purl
SL: Slip
SK: Skip
M: Move this is mostly filling in a hole you created by decreasing one in rather than on the very end. It keeps a nice chain to follow when sewing up later.
ST: Stitch
D: Decrease
MBO: Modified Bind Off
EW CO 104 pegs flat
Row 1-30: SL1, (K1, P1, to end), K1 (you can choose to rib or seed stitch and how many rows just remember your total)
Row 31-144: SL1, K103
Row 145: SL1, K103
Row 146: SL1, D K2tog MSL, K98, SK1 D K2tog, MST K1
Row 147: SL1, K101
Row 148: SL1, D K2tog MSL, K96, SK1 D K2tog, MST K1
Row 149: SL1, K99
Row 150: SL1, D K2tog MSL, K94, SK1 D K2tog, MST K1
Row 151: SL1, K97
Row 152: SL1, D K2tog MSL, K92, SK1 D K2tog, MST K1
Row 153: SL1, K95
Row 154: SL1, D K2tog MSL, K90, SK1 D K2tog, MST K1
Row 155: SL1, K93
Row 156: SL1, D K2tog MSL, K88, SK1 D K2tog, MST K1
Row 157: SL1, K91
Row 158: SL1, D K2tog MSL, K86, SK1 D K2tog, MST K1
Row 159: SL1, K89
Row 160: SL1, D K2tog MSL, K84, SK1 D K2tog, MST K1
Row 161: SL1, K87
Row 162: SL1, D K2tog MSL, K82, SK1 D K2tog, MST K1
Row 163: SL1, K85
Row 164: SL1, D K2tog MSL, K80, SK1 D K2tog, MST K1
Row 165: SL1, K83
Row 166: SL1, D K2tog MSL, K78, SK1 D K2tog, MST K1
Row 167: SL1, K81
Row 168: SL1, D K2tog MSL, K76, SK1 D K2tog, MST K1
Row 169: SL1, K79
Row 170: SL1, D K2tog MSL, K74, SK1 D K2tog, MST K1
Row 171: SL1, K77
Row 172: SL1, D K2tog MSL, K72, SK1 D K2tog, MST K1
Row 173: SL1, K75
Row 174: SL1, D K2tog MSL, K70, SK1 D K2tog, MST K1
Row 175: SL1, K73
Row 176: SL1, D K2tog MSL, K68, SK1 D K2tog, MST K1
Row 177: SL1, K71
Row 178: SL1, D K2tog MSL, K66, SK1 D K2tog, MST K1
Row 179: SL1, K69
Row 180: SL1, D K2tog MSL, K64, SK1 D K2tog, MST K1
Row 181: SL1, K67
Row 182: SL1, D K2tog MSL, K62, SK1 D K2tog, MST K1
Row 183: SL1, K65
Row 184: SL1, D K2tog MSL, K60, SK1 D K2tog, MST K1
Row 185: SL1, K63
Row 186: SL1, D K2tog MSL, K58, SK1 D K2tog, MST K1
Row 187: SL1, K61
Row 188: SL1, D K2tog MSL, K56, SK1 D K2tog, MST K1
Row 189: SL1, D K2tog MSL, K54, SK1 D K2tog, MST K1
Row 190: SL1, D K2tog MSL, K52, SK1 D K2tog, MST K1
Row 191: SL1, D K2tog MSL, K50, SK1 D K2tog, MST K1
Row 192: SL1, D K2tog MSL, K48, SK1 D K2tog, MST K1
Row 193: SL1, D K2tog MSL, K46, SK1 D K2tog, MST K1
Row 194: SL1, D K2tog MSL, K44, SK1 D K2tog, MST K1
Row 195: SL1, D K2tog MSL, K42, SK1 D K2tog, MST K1
Row 196: SL1, D K2tog MSL, K40, SK1 D K2tog, MST K1
Row 197: SL1, D K2tog MSL, K38, SK1 D K2tog, MST K1
Row 198: SL1, D K2tog MSL, K36, SK1 D K2tog, MST K1
Row 199: SL1, D K2tog MSL, K34, SK1 D K2tog, MST K1
Place stitches on stitch holder and repeat this for the back.
Sleeve
EW CO 72 pegs Flat
Row 1-30: SL1, (K1, P1, to end), K1 (you can choose to rib or seed stitch and how many rows just remember your total)
Row 31-126: SL1, K71
Row 127: SL1, K71
Row 128: SL1, D K2tog MSL, K65, SK1 D K2tog, MST K1
Row 129: SL1, K69
Row 130: SL1, D K2tog MSL, K63, SK1 D K2tog, MST K1
Row 131: SL1, K67
Row 132: SL1, D K2tog MSL, K61, SK1 D K2tog, MST K1
Row 133: SL1, K65
Row 134: SL1, D K2tog MSL, K59, SK1 D K2tog, MST K1
Row 135: SL1, K63
Row 136: SL1, D K2tog MSL, K57, SK1 D K2tog, MST K1
Row 137: SL1, K61
Row 138: SL1, D K2tog MSL, K55, SK1 D K2tog, MST K1
Row 139: SL1, K59
Row 140: SL1, D K2tog MSL, K53, SK1 D K2tog, MST K1
Row 141: SL1, K57
Row 142: SL1, D K2tog MSL, K51, SK1 D K2tog, MST K1
Row 143: SL1, K55
Row 144: SL1, D K2tog MSL, K49, SK1 D K2tog, MST K1
Row 145: SL1, K53
Row 146: SL1, D K2tog MSL, K47, SK1 D K2tog, MST K1
Row 147: SL1, K51
Row 148: SL1, D K2tog MSL, K45, SK1 D K2tog, MST K1
Row 149: SL1, K49
Row 150: SL1, D K2tog MSL, K43, SK1 D K2tog, MST K1
Row 151: SL1, K47
Row 152: SL1, D K2tog MSL, K41, SK1 D K2tog, MST K1
Row 153: SL1, K45
Row 154: SL1, D K2tog MSL, K39, SK1 D K2tog, MST K1
Row 155: SL1, K43
Row 156: SL1, D K2tog MSL, K37, SK1 D K2tog, MST K1
Row 157: SL1, K41
Row 158: SL1, D K2tog MSL, K35, SK1 D K2tog, MST K1
Row 159: SL1, K39
Row 160: SL1, D K2tog MSL, K33, SK1 D K2tog, MST K1
Row 161: SL1, K37
Row 162: SL1, D K2tog MSL, K31, SK1 D K2tog, MST K1
Row 163: SL1, K35
Row 164: SL1, D K2tog MSL, K29, SK1 D K2tog, MST K1
Row 165: SL1, K33
Row 166: SL1, D K2tog MSL, K27, SK1 D K2tog, MST K1
Row 167: SL1, K31
Row 168: SL1, D K2tog MSL, K25, SK1 D K2tog, MST K1
Row 169: SL1, K29
Row 170: SL1, D K2tog MSL, K23, SK1 D K2tog, MST K1
Row 171: SL1, D K2tog MSL, K21, SK1 D K2tog, MST K1
Row 172: SL1, D K2tog MSL, K19, SK1 D K2tog, MST K1
Row 173: SL1, D K2tog MSL, K17, SK1 D K2tog, MST K1
Row 174: SL1, D K2tog MSL, K15, SK1 D K2tog, MST K1
Row 175: SL1, D K2tog MSL, K13, SK1 D K2tog, MST K1
Row 176: SL1, D K2tog MSL, K11, SK1 D K2tog, MST K1
Row 177: SL1, D K2tog MSL, K9, SK1 D K2tog, MST K1
Row 178: SL1, D K2tog MSL, K7, SK1 D K2tog, MST K1
Row 179: SL1, D K2tog MSL, K5, SK1 D K2tog, MST K1
Row 180: SL1, D K2tog MSL, K3, SK1 D K2tog, MST K1
Row 181: SL1, D K2tog MSL, K1, SK1 D K2tog, MST K1
Place stitches on stitch holder and repeat for other sleeve.
Add all the remaining stitches on stitch holders back to the loom for 87 pegs total you may have 88 stitches that is okay that will make it even to do a rib stitch. Keep in mind right side facing you and wrong side facing the middle of the loom. Also make sure it is sleeve, front, sleeve, and back.
This pattern uses a 36 peg loom, you use the yarn equivalent to the gauge.
This is an intermediate pattern. It is done in 3 pieces and yes that means the legs are worked into the body for less parts to sew.
You will need safety eyes, safety nose, polyfil, yarn for gauge (yardage depends on gauge), crafters needle, and looming hook. If you are using the large gauge 3/4" gauge you will want 2 skeins of say Lions Brand Hometown USA as a gauge for yardage. I personally use a 3/8" gauge loom and the animal ended up being approximately 12" long. So if you are using a larger gauge the animal will be bigger.
Pattern will be available on Ravelry, Love Knitting, and Cindwood website.
Release date for the PDF on Ravelry . Hoping to have the paperback ready on Amazon later next week. Will be available in Ravelry, Cindwood, Kindle, Amazon, and Create Space.
For the last year and then some, I have been researching and
learning about socks. Much of early learning had trial and error like most do,
but the more you do, the better you get. In this book it might as well be a
dictionary or encyclopedia of socks for the looms. While you can do a literal
translation from needles to loom, sometimes it isn't functional, and more
effort than it is worth. My goal for this book was to get the look of the
needle knit, but the ease for the loom. Some things still were difficult even
on the looms, but were included anyway. Please keep this in mind if you are a
needle knitter and are looking to learn the loom for socks, these are not
literal translations. They are more on average an essence of the techniques.
In this
book I will go over a vast number of things from brands, looms, gauges, yarns,
sizing, cheats, swatching, and so much more. I will also go over basic sock
styles and include some history on a few of the styles that are in this book.
If you are interested in knowing as much as you can about everything socks,
then this is the book that has it.
If you need
to know if a certain technique is a skill level you can achieve, I will be
including a star rating. One star for beginner, two stars for intermediate
beginner, threes stars for intermediate, and four stars for advance. This will
help you decide if you can work the technique, or even if you want the
challenge of the technique.
Much of
this book has photos and plenty of written instructions, but the wonderful
thing about this book is, almost every single thing has a video tutorial for
it. This means you get visual help, along with the written. Making this book
very helpful for those visual learners who kind of understand written, but need
to see it as well.
Heels,
toes, and socks styles have formulas, this is a concept of plug in measurements
and equations, and use a calculator to figure up any size, in any technique or
style sock you want. This is nice, in that is doesn't block you from making
sizes and using different looms and gauges.
I have focused on the Cindwood loom brand for
this book, many other brands have versatile looms that you may have to maneuver
a little differently to get the same look. This means you will need to keep an
open mind as to how you can use the looms you have, to work up the same
techniques on the Cindwood looms. I am not an expert on loom brands, I have
tried to become more of an expert on the variety of techniques. If you are
interested in who you can talk to about brands I have included names in this
book along with links to websites to be able to get in touch with these people
who can better answer your questions. I have even sought some of these peoples
help on being able to put info down in this book so you can have a better idea
on other brands you would like to try.
This covers
a general overview of the book, and now it is time to dive in and get started
making socks!!! Happy Sock Looming!!!
Release date for the PDF on Ravelry . Hoping to have the paperback ready on Amazon later next week. Will be available in Ravelry, Cindwood, Kindle, Amazon, and Create Space. Keep a close eye on postings!!!!